Reusserland
  • Links
  • Sewing
  • Music
  • Travels
  • The River House
  • Top Secret

Thome's Green Ohio Star Quilt Top

7/30/2022

0 Comments

 
Picture
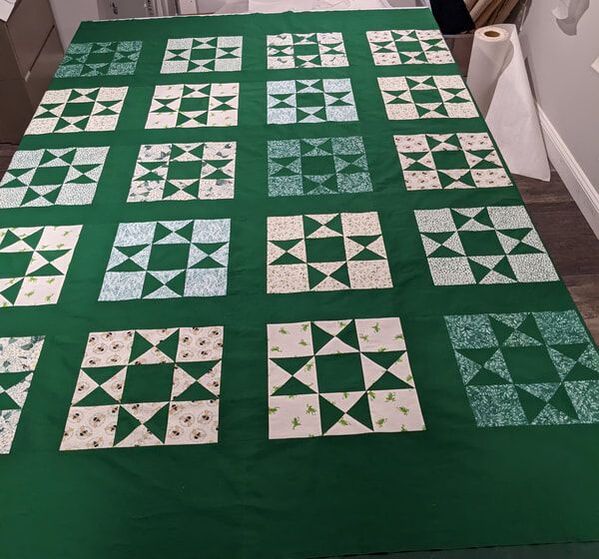
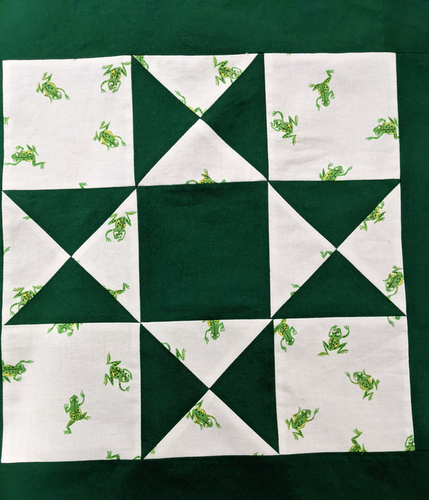
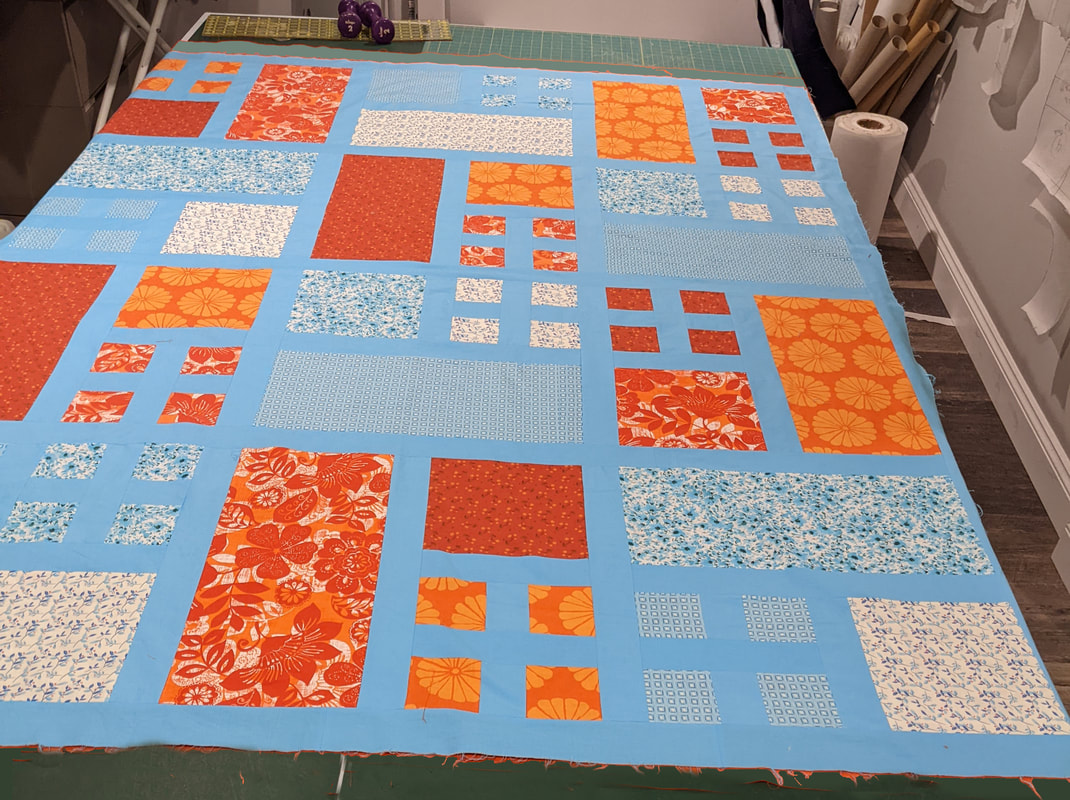
I finished the top for my daughter's quilt! I am pretty pleased with it. I did a lot better matching the points of the stars than my first time around. One thing I did differently is I made the pieces for the quarter square triangles bigger than recommended so that when it was time to trim them down, I had more room to play with. It was very helpful!!! When I had just 0.25 inches of clearance, I inevitably ended up with some squares that just couldn't be the perfectly centered into the 4-inch final size that I needed. With 0.5 inches of extra, it worked out much better. Now, I'm not saying that by the time I got to trimming the squares to their final 12-inch size that I didn't have some aggravating shortages here and there, 'cause I did. But all in all, even those were small enough that I could work with them and just have slightly less fabric on one side of the 0.25-inch seam. 

The second thing I did differently that helped with the matching is that I was a lot more careful about the matching! I saw a nice YouTube video by Quilt Addicts Anonymous with helpful tips and one was a way to use pins to help match points. 

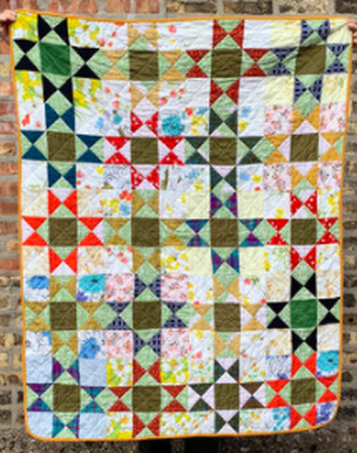
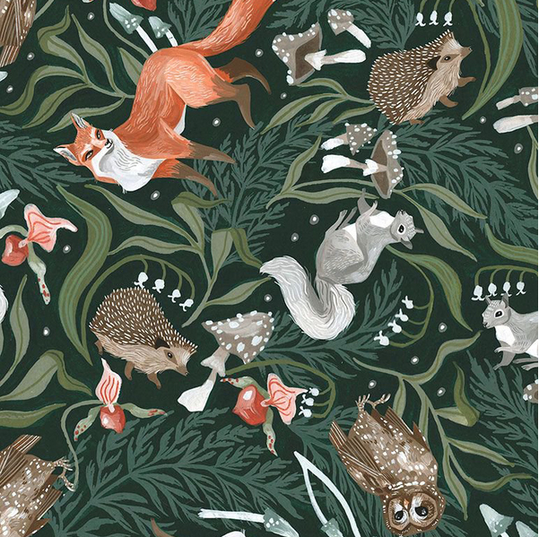
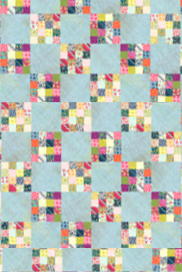
When I ran the idea of a quilt past Thome, she said she'd also like an Ohio star quilt, and the color she'd like it to be was green. She's a nature lover, so I decided to make it out of a mix of nature fabrics. Originally, I thought I could mix it up a lot, with the light and dark squares being all different prints, like this one below. Isn't it lovely? (I copied it from Pinterest...sorry, not sure whose it is...)
Picture
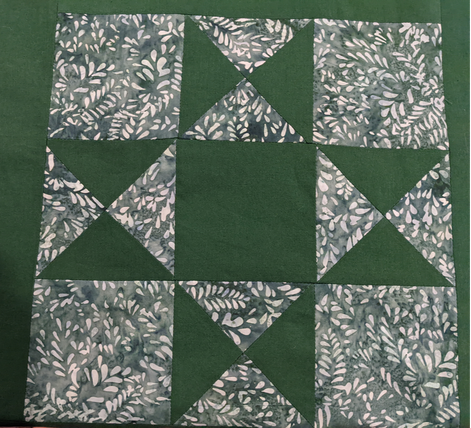
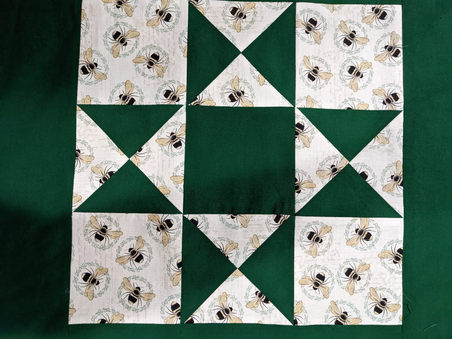
But, in the end, I felt I wasn't experienced enough (and the variety of fabrics I was seeing wasn't sufficient) that I decided to anchor the prints with a single solid for the stars and sashing. I had a dark batik in play for a bit during the planning stages, but in the end I didn't like the extra busy-ness it added (or the stiff feel of it for that matter). When I ran a couple design ideas by Thome, she preferred this dark overall look, so I went with the solid green.

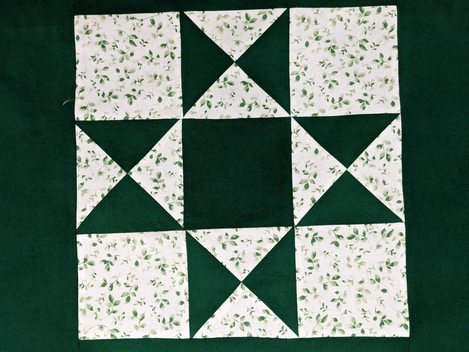
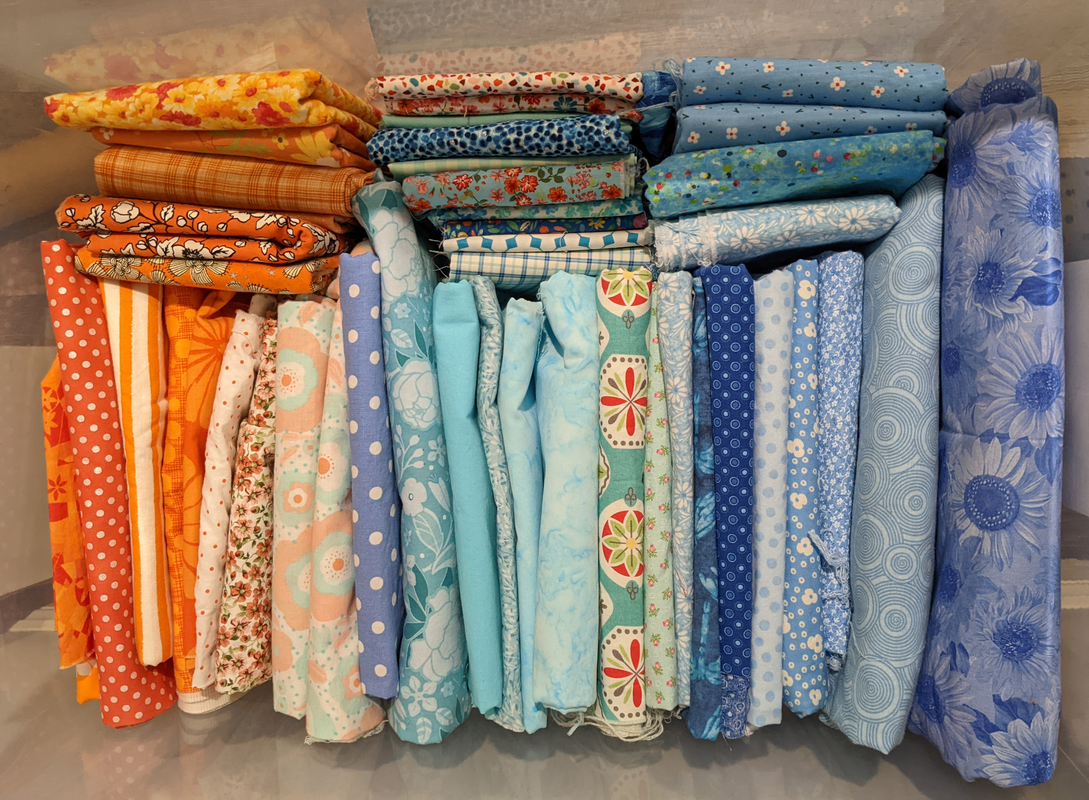
I used a total of 7 fabrics. I named them all so I could keep them straight during the playing-around-with-placement stage and the sewing phase. They were all the ones that worked together of those I had collected over several months. Ideally, I might have liked more, or different ones, but this is what I could find that matched the theme and color ideas I was going for.   ​
The Batik Square (not the same batik fabric I had been considering as the dark anchor color)...
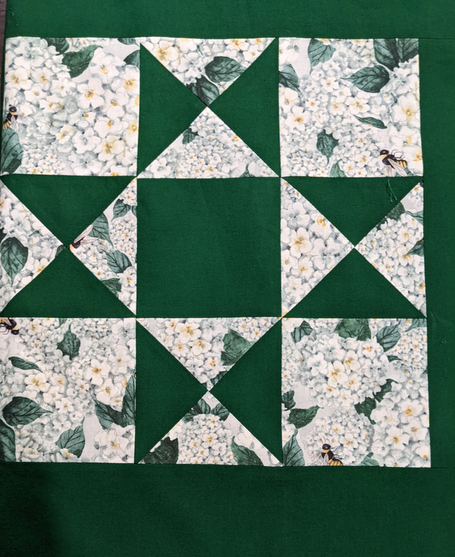
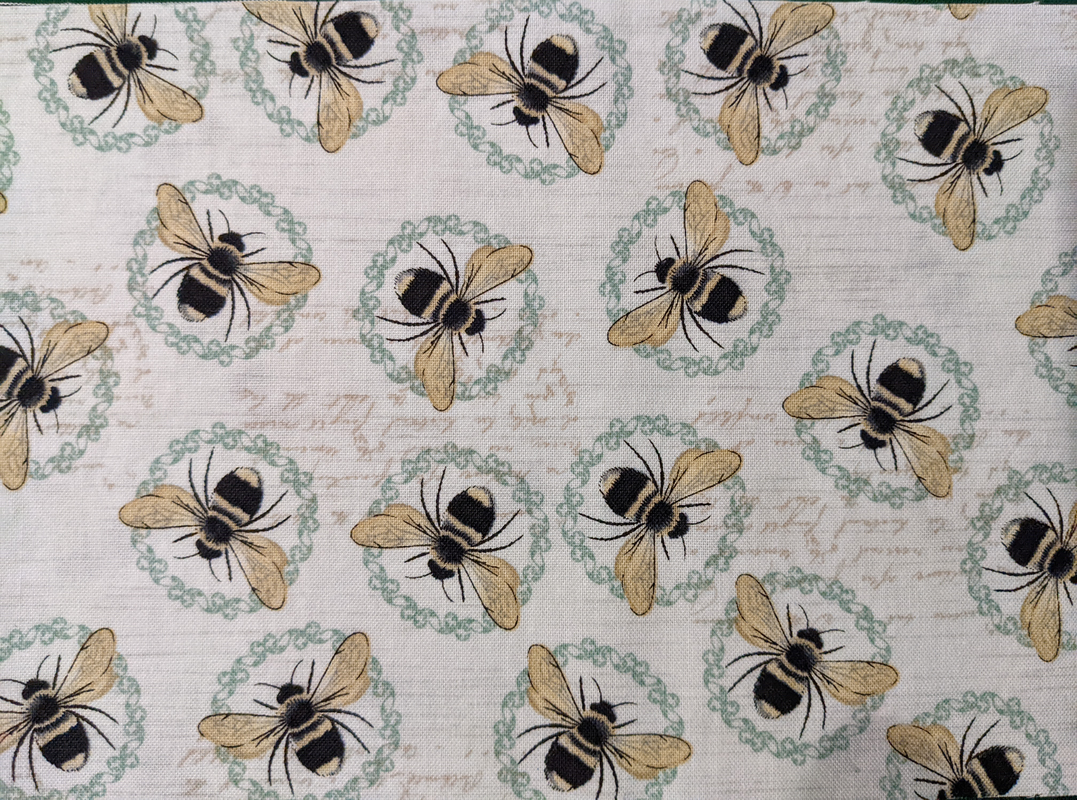
Picture
The Bee Square...
Picture
The Hydrangea Square... 
Picture
The Tiny Flowers Square...
Picture
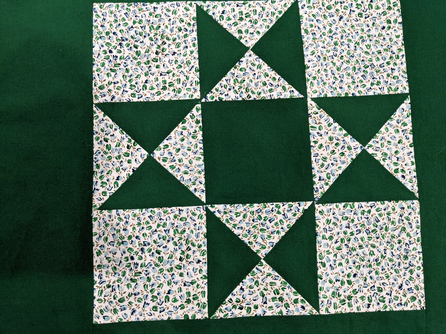
The Blue Square (because it has a blue tint)...
Picture
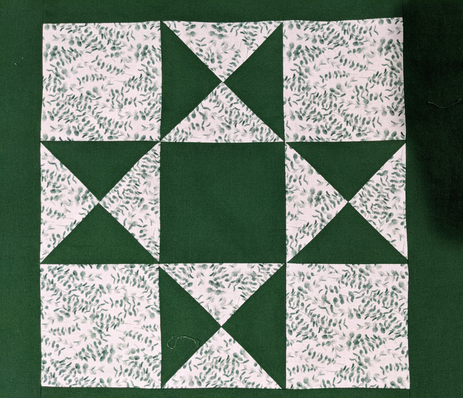
The Leaves Square...
Picture
The Frogs Square...
Picture
Now I just need the quilt backing, and I can get it to the quilter's and into her long queue!!! But I am a little stuck. I will have to find a suitable fabric. I had bought reams of the bee fabric, originally intending that it would be the backing. 
Picture
There are now two problems, though, well, maybe three. 
  1. I don't have enough of this fabric because I decided to use it as one of the 7 fabrics for the squares on the front. I was just in Joann's and this fabric is g.o.n.e. I can start doing the hunt-for-discontinued-fabric-at-all-my-local-Joann-stores quest again, which I really don't care to do, or I can find something else. One downside is that I am just one f-ing yard short so I'll have to find another use for 3.5 yards of bee fabric.
  2. I want to use a different fabric on the back from any I used on the front...and I keep thinking there might be somegthing super sweet out there that would really elevate the whole piece.
  3. I wonder if having bees next to your body is off-putting. The image should be soothing and comforting...but bees sting, so I'm second-guessing this choice.

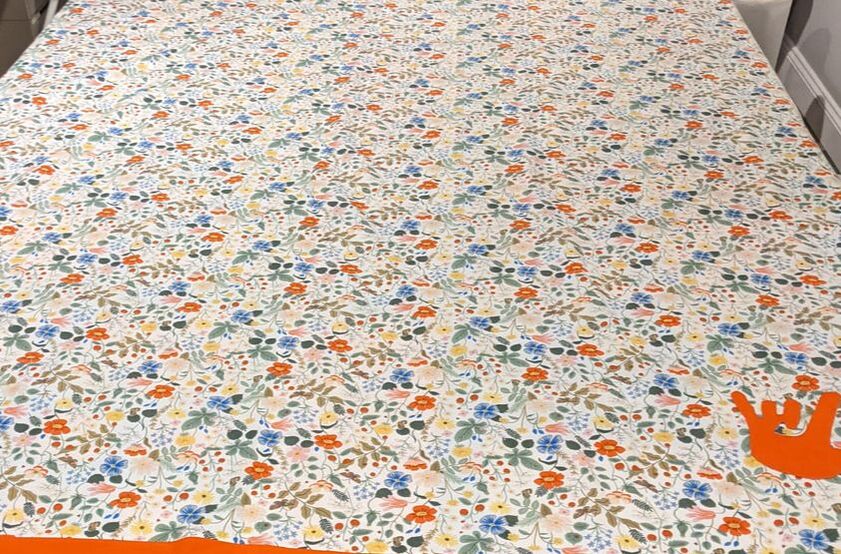
I found the fabric I will use for the backing! I found it online at Hawthorne Supply Co. The only bummer is that it will take a week or two to get here. :-(  So I won't be able to get the quilt sandwich to the quilter's for a while.
Picture
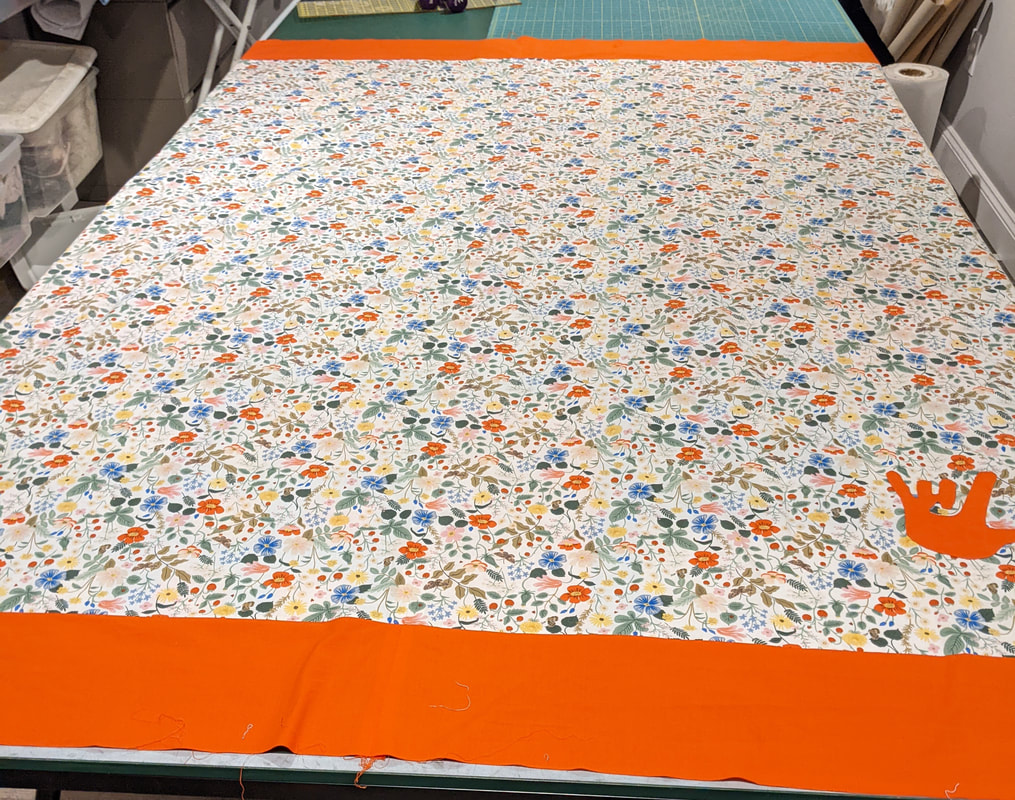
Update: I finished the back! I made a seam down the middle and matched the print perfectly using the same technique as with my sister's quilt. Unfortunately, the repeat was over 4 inches horizontally, and I didn't have enough width to give the longarmer the 4 extra inches she needs on each side. I was short about 3.5 inches. I had enough extra from what I trimmed for the center matching to add 2 inches to either side of the back. That print didn't match at all of course, so I'm hoping whatever of that bit is needed when the quilting is done isn't much and ideally will be buried in the binding.

I got it all done and took it to the quilter's today!!! She can't get to it before OCTOBER. I'm glad she's doing great business. She's very good and she's only 15 minutes away from me.
0 Comments

A Set of Skirt Fails

7/15/2022

0 Comments

 
Having put on some pounds (God, is that all she talks about these days?), but wanting to evolve from my sweats-and-tee-shirt look to something more thoughtful (it's not very nice to not even try to look good and to go out in public looking dumpy).

But I don't have anything that fits.  I thought some circle skirts would be comfortable and nice-looking. ​

Skirt #1: Goodwill-Sheet Test

I first made a test skirt out of a jersey sheet I bought from Goodwill. I wanted to try a wider elastic waistband and I knew the diameter of the skirt couldn't be too much wider than my hips because I didn't want the waistband itself to gather. It was meh. I mean, it's just a test garment and the stitching on the waistband (and the thread color) can be forgiven, but the elastic is too wide for me, I think.
Picture

Skirt #2: Gathered Maxi

But then I found a cheap and lightweight jersey with a pretty design on huge markdown in the bargain bin at Joann's. I decided to try again using this fabric to make a maxi skirt. The elastic for this waistband was not as wide as on the test skirt—1.75" maybe—and I like it much better.  But really, this style is not the most flattering for me I think. I would like to be able to wear a maxi skirt—I think it would keep me warmer during the summer  months indoors at restaurants and such. But, alas, this look does not spark joy. Might be the pounds.
Picture

Skirt #3: Narrow Gathered Waist 

And then I was going through a bin of fabric and found a cheap knit I'd bought 10 years ago for a tie-making project that was never completed and I thought it might make a nice cheap and quick skirt for bumming around the house in the summer. This one I made with a narrow waistband and 1.5 x my hip measurement. It's hideous I suppose, but I wear it. In public.
Picture

Skirt #4: Woven Circle

Next I thought I'd try a woven skirt with a flat waistband and zipper closure. I went searching for a tutorial and found a helpful one at Megan Nielsen ("how to make a dirndl skirt"). I had a feeling a dirndl would not look good on me, but you can't sue me for at least trying. I used a remnant of a lovely Robert Kaufman lawn print in my stash.
Picture
Okay, so first off I cut out the pieces following the instructions precisely, including the 5"-width waistband, and basted it together. Five inches? Who has a waist that long? Well, I guess the model does because the skirt looks good on her. On me, it was comical. I took it apart and cut the waistband down to 1.5 inches. Then I sewed it all together and put in the zipper. (I used this super helpful tutorial by Angela Wolf.) I put it on and...no. Way too much gathering for me. 

I took it all apart. I cut the diameter down to a bit more than 1.5 my waist measurement. Put it all back together and this is the result. 
Picture
Sigh. No, I don't think so.
0 Comments

A Trio of Gap-Copy Dresses

7/15/2022

0 Comments

 
Years ago, I had a couple of cotton jersey t-shirt dresses I had bought from Gap. They were cute, comfy, and nice-fitting. My husband raved about them whenever I wore them, and I wore them a lot. One started to look the part, a bit stretched out and a lot stained, so I decided to copy the one that was less worn before I lost my chance.

Dress #1: Mock-Up

That was at least a couple years ago. It probably took me another year to sew a dress out of the pattern, and when I did it was because I had found a jersey sheet at Goodwill that I could use without risking any good fabric.

Well, the dress turned out really nicely. So nicely, in fact, that I wear that Goodwill sheet Gap dress a lot. It's pretty short and I never hemmed it, so I don't wear it in public...much. But when it's hot, it's awfully nice to wear that lightweight little number.
Picture

Dress #2: Superhero

Now, I have been meaning to make another for some time. But lots of other things got in the way or took precedence. Then inspiration hit. I was at Joann's getting something for one of the projects I was working on recently...I can't remember what exactly...when I thought: "why not check out the bargain bin again?" 

And I found a jewel...a lovely cotton interlock with Marvel superheroes on it...for $3 a yard. C'mon. I could not pass it up.

It didn't take me long to make it up. It's ridiculously easy to put this dress together—except for the f-ing bands. OMG I took out the neckline band twice before I got it where I wanted it. I first sewed it in wrong. Okay, I had only basted that in but still. I rebasted and used my coverstitch. It was infuriatingly bad. Uneven, all over the place, hideous. I came upstairs cursing how much I hated that Janome Coverstitch 900, how I would never use it again, and bemoaning the fact that I chose it over a Babylock (because it was so much less expensive although it was still not cheap). I even started to hunt around for a Babylock Euphoria. 

I cooled off, went back to the sewing room, and I ripped the neckline out, not fun, and rebasted and then used a twin needle. That worked beautifully.

I had already done the armbands 0n the coverstitch. They were okay, not great, but not noticeable enough for me to rip them out and do them over.  

I added about 4 inches to the pattern that I made and used for the Goodwill version, but I ended up cutting off 2 inches before hemming. Isn't it cute?
Picture
Closeup of the neckline and fabric design:
Picture

Dress #3: Spiderman

Soon after I was back at Joann's getting buttons for the blue linen Harvey when I thought..."what if there is another awesome bargain in that bin?" And do you know what? There was: a similar Marvel-themed interlock, also for $3 a yard. I made up another Gap-copy dress as soon as I had washed the fabric.

This time I went straight to the twin-needle technique but I started with the hem, thank goodness. Because it looked like crap. I tried many settings on my machine and it just would not stop tunneling.

Frustrated, I went back to the coverstitch and tested some stitches on the new fabric. Still terrible. Then, fortunately, it dawned on me that I might not have the settings in the best place. Maybe I could do some research.

I first went to YouTube and found a very helpful and basic tutorial about my machine on the Last Stitch channel. She noted the importance of the differential feed setting. So next I checked in the manual. OMG. Somehow all my settings were in all sorts of strange places. I returned all the tensions, the stitch lengths, and the stitch widths back to recommended settings and played with the differential feed a little and found a setting that created a beautiful hem. 

Finally, I basted the arm and neckbands on and coverstitched those. The neckline. Arrrgh! I decided to baste it down on the front and follow the basting on the coverstitch. It turned out much better than when my settings were all awry, but still, the stitch placement was not perfect, and wouldn't you know, the worst spot was on the front. There is a little lip the floats a little bit above the main fabric and irritates me (my sensibilities, not my skin). Still, in the end, I said "fuck it. It's good enough." Now if I can only lose 20 pounds, it might be downright adorable.
Picture

Closeup of the neckline and fabric design:
Picture
0 Comments

Harvey in Blue Linen

7/15/2022

0 Comments

 
Picture
I'm starting to feel the heat. When I was younger, it couldn't get hot or humid enough for me. But now, when it's around 90, I am uncomfortable. I am playing in a summer orchestra, and we rehearse in an unconditioned church, so I wanted to find something breathable to wear.

I have my white linen Harvey that I had made a couple years ago for the beach at Hilton Head. I wore it to rehearsal, but because it's fairly see-through, I wore it with some yoga pants. My top half felt great, but my bottom half was pretty sweaty.
Picture
It then occurred to me that I had plenty of a heavier-weight linen that I'd used to make a sheath dress (which turned out to be too big at the shoulders and hideous because of that). ​
Picture
Ooooh, that is actually too flattering a picture. This one is more accurate:
Picture
So I made a new Harvey out of that. I am pretty pleased with it; I'm not sure if it's the fit, the fabric, or the extra 20 pounds I'm carting around that displease me a bit.
Picture
Because of the extra pounds I have put on, I hesitated to get started. I thought I'd have to revisit the sizing and trace out a new pattern. I wasn't looking forward to that process because I really don't know what I'm doing when it comes to fitting a new pattern, especially for a woven fabric, and it's tedious trial and error.

I was dreading the thought of making another fucking muslin; I just want to sew a garment that fits without having to sew two of them and throw the first away. But it's risky to just sew with your good fabric. Witness the blue-linen-sheath-dress disaster.

​But then I had a Eureka moment. I had just 
worn the white linen Harvey that I made when I was 20 pounds lighter: It fit me just fine. I did notice that the bust dart was too high, so I moved that down an inch, which is not hard to do at all. (For more proof of the vagaries of fitting...the bust dart on the blue linen is still too high.)
Picture
The blue linen is heavier than the white linen. It still feels breathable, but I am looking forward to test driving it in the hot church to see if it's comfortable.
0 Comments

Moira's Quilt

7/15/2022

0 Comments

 
I finished my third quilt, one I made for my sister Moira. She has a vintage camper she restored all by herself. She painted the outside blue and orange, and she's decorated the inside with the same color scheme.  I am pretty happy with how it turned out, not completely happy because of how bold the orange is and how recessive the blues are on the front, but in the end, I think it is pretty. I hope she likes it! It is at the quilter's now,  and I won't get it back for 2 months. When I do, I will bind it in the same orange solid fabric that borders the top and bottom of the back. 
The front:
Picture
​The back (the applique is a hand saying "I love you" in American Sign Language; Moira was an interpreter before she retired):
Picture
Okay, so once I got going, the quilt was easy to put together. But, oh my, I had a hard time getting started! I have been wanting to make a quilt for her since I finished my RV quilts last March, but I finally started construction in June. 

The first issue was the pattern. My sister had sent me a picture of something she liked early on, and it was a pretty 16-patch variation that looked vintage and sweet.
Picture
I had that idea in my head when I started gathering fabrics, but she did not sign off on it, and I wouldn't start on it until I was sure that she was sure. She kept looking, I kept looking, and life got in the way and took up of lot of both our time. Eventually, she settled on one image, and I looked around and actually found the quilt pattern. It is called the Patio quilt by Happy Zombie:
Picture
I bought it, and it was very easy to follow. 

Next, I needed to decide on the fabrics I would use. This process turned out to be lengthy and stressful and a monumental learning experience.
  • Lesson number 1: Be sure you know what precise hue your recipient wants if you are making something for someone else. In general, just be sure of your recipient's tastes in all matters that will pertain to the final quilt. 
  • Lesson number 2: Don't start buying fabric until you have made the final selection of the pattern (I know that good quilters assemble big stashes of beautiful fabrics and then make good use out of them, but I am trying to be mindful of how much quilting fabric I buy; I don't want to amass a huge quilting-fabric stash as I did with my garment fabrics, especially when I am new to quilt making and at the beginning of figuring out what I want to make and what I like. I am trying to be cautious and buy what I need. I'm already failing a bit, but I guess it would be worse if I weren't trying. But would it???) 
  • Lesson number 3: Do not go to the fabric store without a swatch in hand. And as a corollary to that point, be prepared to be disappointed with online purchases. Wow, you can be deceived by the pictures on a website! Still, I could not have done without online purchases. I found the blue background fabric online, and I really, really, really wanted that exact color for the background. I am not sure how to get around this problem. I guess I could buy swatches, but I am so impatient that that option is hard for me to entertain.  Maybe I could contact the seller and use Pantone color references to get more accurate information. 

I had already skirted with color disaster once before when I made her a couple pot holders with some fabrics I thought were the right colors. She liked the gift, but she told me the teal was not the right color. 
Picture
So when I started fabric hunting in earnest, I knew teal was out. But boy there are a lot, lot, lot of blues. I wonder if specific hues go in and out of fashion, too, because teal was everywhere and the blue I wanted was almost impossible to find.

Not that I realized that at first. While I filtered out teals as I was looking, I bought many blue fabrics before I ever compared them against her camper paint job. I think it was only when I had piles and piles of blue fabrics that did not all coordinate with each other that I figured I had better actually look at her camper to see if anything matched.

I had one robin-egg-blue solid that I had gotten from Missouri Star (online!) that matched the blue on her camper exterior well, while almost nothing else in my collection did. One, possibly two fabrics. All of the orange fabrics I had collected worked, fortunately.

Now, in spite of my best intentions, I had a huge pile of quilting fabrics I would not be using for this project. The reason it happened was only partly because I had been unclear about the blue I needed. The other problem was that I had started to gather fabrics back when I thought I might be making the 16 patch...which of course would require many different fabrics. Lesson learned. Hopefully.
Picture
When finally armed with a swatch for the correct blue, I returned to the stores and could find nothing. Reluctant to return to the crap shoot of online stores, I was stuck until I remembered the brick-and-mortar store where I had gotten my first two quilts quilted, the Quilting Bee in Lakewood, Ohio. I went there and found one fabric I liked. I took it home, compared it with two other blue fabrics and the oranges, and decided it would work great. But when I returned to the store, I learned I had bought the last fat quarter in the store. That fabric was out.  

I began to comb the store. The owners dug through their shelves and kept bringing me possibilities. In the end, I found two other blue and white candidates and two very different floral options, both beautiful but neither the right "blue." The owners suggested it could still look good to deviate from the exact blue I was looking for, and I decided to give it a shot.

I took all the fat quarters home and laid everything out. In the end, I chose the two blue fabrics that were closest to the target blue for the quilt front. The other two florals were so beautiful and I tried hard to imagine them working. But they just wouldn't; too risky.

I could not get one of those out of my head, though. It so was beautiful, and I thought my sister would love it. So I decided I would make it the quilt back. I was so happy when I thought I could use that fabric! I raced back to the store...only to find they had just under 4 yards left, a half a yard at least shy of what I needed! OMG. I bought it anyway.

​I used this tutorial to match the print of the backing fabric using a glue stick. I had to lose just a little yardage on one of the pieces to match the pattern when piecing, and then I got the idea to use the orange (from the stash, hahaha) as a border. I suppose I might have liked a full floral back, but I smile and feel joy every time I look at this. 
Picture
0 Comments

Rocking Chair Pillows

7/12/2022

0 Comments

 
Picture
I made cushions for my daughter's friend who was having her first child. I like how they turned out . . . I hope they are durable.

Once I started making them, it went quickly and smoothly enough. I had a hard time getting started though because of three issues: finding enough fabric, questions about what style to sew, and questions about the best (and most comfortable) construction.

First off, my daughter's friend bought the fabric. I misunderstood and thought initially she only wanted a bottom cushion so I told her to buy a yard. When I learned she wanted the top cushion too, the hunt for the fabric was on.

The yard had been purchased at Joann's in Columbus (2 hours south of me), so I went to my local Joann's a couple times, and looked at the company's online selection. The fabric was nowhere to be found. My daughter went to the Columbus Joann's, and I looked at another Joann's near my dad's. Nope. I went to a couple Michaels and a Hobby Lobby. No luck. I decided to find a suitable back-up fabric so I could use it to make the back and bottom of the cushions and use the one yard for the front and top, a light yellow broadcloth.
​But then, as a last resort, I drove to a Joann's I'd never been to about 30 minutes west of me. They had it!!! One last bolt with a couple yards left on it. ​
Picture
Then I needed to decide what kind of cushions to make. Although I had an idea of what to do from seeing such cushions all my life, I looked at a lot of cushions online to get an idea if there was anything better. 
Picture
I liked piping but I didn't like the band around the sides. 
Picture
In the end, I liked the tufting or buttons and the classic shapes.  I couldn't decide on the filler either. It seemed it should be fiberfill but I had these high-density foam pieces that seem so comfortable. I finally decided to make a couple test cushions out of the yellow broadcloth, use fiberfill, and see how they felt. They were good and plenty comfy. I decided to use the test pillows for the insides and make covers out of the fabric. I forgot to interface the fabric—I really wish I'd remembered for the sake of durability, but at least the double cushions provide some sturdiness, I think. ​
Picture
Picture
I was waffling about the style, trying to second guess what the new mom wanted. She had said she wanted a zipper, but the tufting would make that impossible. Finally,  it hit me I could just ask her. I don't know what my hang-up was.

We settled on tufting plus buttons on the back and tufting on the seat. From there, I had them made in a couple days.

I had read and watched a lot of tutorials for different kinds of cushions, but the one style I wanted I couldn't seem to find. It looked to be simply constructed, out of two pieces with some sort of fold magic. I finally found it on Ageberry's YouTube site [
video]. 
Picture
I found buttons I liked at Joann's and put those on the top cushion. The bottom is just tufted.
Picture
Picture
​I worry about the fabric wearing through and the tufting—I hope both stay in good shape through washings.
0 Comments

    Author

    I am a wife and mother. I am retired: yay! 

    Archives

    April 2025
    March 2025
    January 2025
    November 2024
    August 2024
    July 2024
    June 2024
    May 2024
    April 2024
    March 2024
    January 2024
    December 2023
    September 2023
    February 2023
    January 2023
    December 2022
    November 2022
    October 2022
    September 2022
    August 2022
    July 2022
    November 2021
    October 2021
    March 2021
    January 2021
    December 2020
    September 2020
    July 2020
    June 2020
    May 2020
    January 2020
    December 2019
    October 2019
    September 2019
    January 2019
    July 2018
    May 2018
    March 2018
    February 2018
    January 2017
    March 2016
    April 2013
    March 2013

    Categories

    All
    Bags
    Costumes
    Dresses
    Home Decor
    Outdoor
    Pants
    PJs
    Quilts
    Skirts
    Stuffed Animals
    Tools
    Tops
    Toys

    RSS Feed

Proudly powered by Weebly