Reusserland
  • Links
  • Sewing
  • Music
  • Travels
  • The River House
  • Top Secret

Doll Clothes: Queen Elizabeth I

1/16/2024

0 Comments

 
Who does this? It's nuts.
Picture
This was an insane project. I didn't want to do it when I was asked, but I couldn't say no. I figured I'd back out later. But then I got into it. It was a LOT OF WORK, but I did have fun. No, I don't ever want to do it again, but I am glad I did it.

So maybe it was Thanksgiving 2023? Eating dinner at my MIL's. My BIL's girlfriend mentioned this American Girl doll she had been given as a child. Said she had wanted to get rid of it, but then had a brilliant idea to put her in a Queen Elizabeth outfit. My BIL volunteered my services. My husband said I'd be thrilled. I was thinking: WTF? And that was even before I realized she didn't mean Elizabeth II but Elizabeth I, which is significantly more difficult. But I couldn't reveal my true thoughts and only said "sure."

A month or two later I had some time and figured I could at least take a look at it. I started researching clothes of the period and Elizabeth I's clothing in particular. I initially thought I'd pattern everything myself, which would have been a Disaster of Epic Proportions, but then I had an epiphany that people might actually make patterns for dolls that I could at least use to get the basics. Lo and behold there are actually patterns for Tudor doll clothes. Amazing.

I decided on the Lettice Knollys pattern by Swish and Swirl. I didn't know what "Lettice Knollys" meant at all but later learned who she was. It's pretty funny--according to Wikipedia, she was the wife of the only man whom Elizabeth I ever really loved. 
Picture
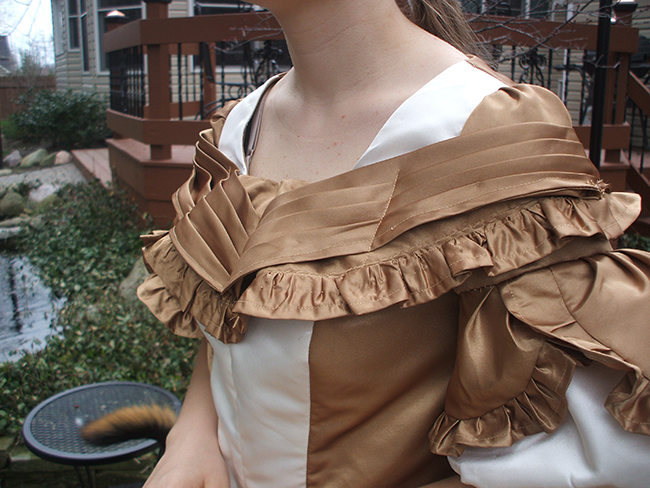
This pattern had the gown and the underskirt. But I wanted to have the partlet too (ruff and shirt), so I needed to buy another pattern for the partlet and it came also with the bonnet and snood patterns; it's by the same company. So now I'm all into it.
Picture
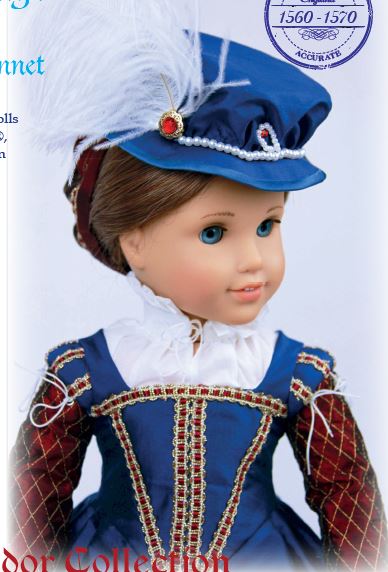
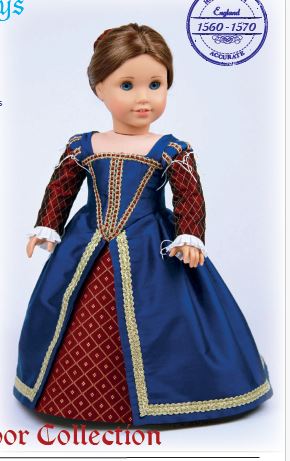
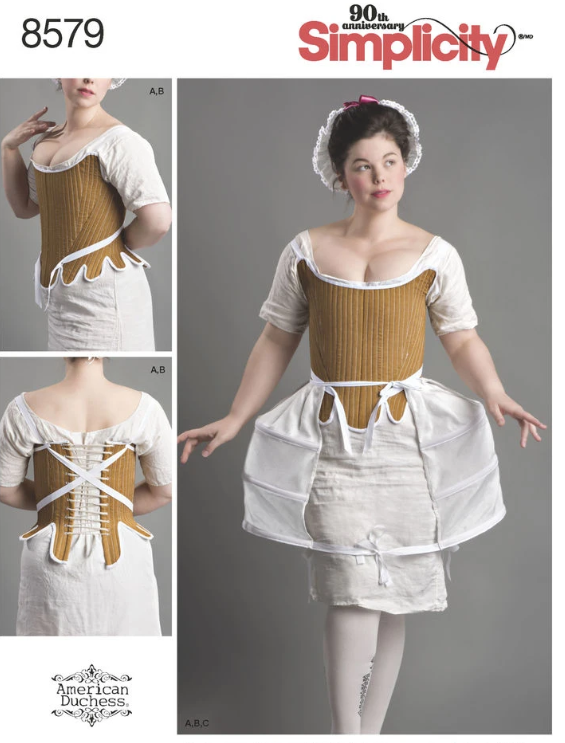
As I was making the first outfit—oh yes, I ended up making two total ensembles—I was thinking that the bonnet was nice and all, but Elizabeth I is pictured more often with a crown sort of headdress. So then I went looking for a French hood that I would adapt into a crown and found this pattern by Read Creations for a "Tudor ensemble." It had the pattern for the hood and also a farthingale and that was too tempting to pass up. It also has a pattern for a gown that looks simpler to sew than the one I had already started—less fancy I suppose, but totally sufficient to create the right impression. Oh well, next life. It also had the petticoat pattern but it does it with three different fabrics so you can just rotate the petticoat around and get a different look. Clever, and a lot simpler than making two whole ensembles to get variety.
Picture
I also made a bum roll. I got the pattern from a video on YouTube. They were working from a Tudor patternmaking book that was referenced in many videos by people who recreate that period clothing for normal human-sized people. I copied from a shot of the bum-roll pattern and because it was on graph paper I could size it for the doll. See? Insane.

Truthfully, that's not why I ended up making two outfits. The real reason is that I first tried to make the gown and petticoat using fabrics I had. I had some remnants from curtains with nice upholstery fabric that I could use for the petticoat and sleeves, and some lining fabric of the right color I thought I could use for the gown. 
​
Picture
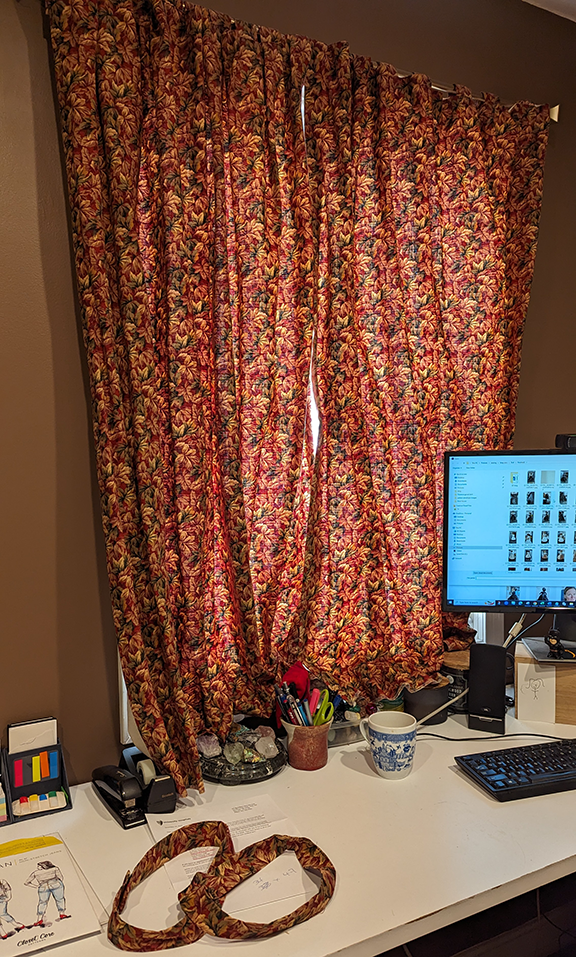
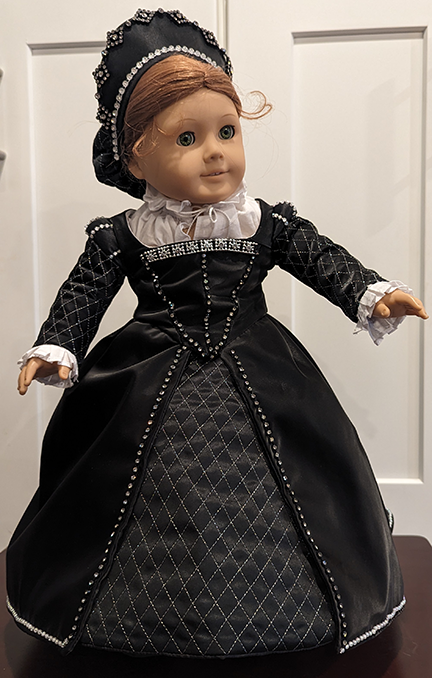
But then I thought better of it and headed to Joann's. MISTAKE. I got the satin I wanted for the gown to go with the curtain fabric, but then I got mesmerized by all the fabric and trim choices Joann's had on hand, and the idea of a black and silver gown was born.

Here is the first outfit made with what I (mostly) had on hand. Trim was all new of course. I don't have that stuff sitting in my stash.
Picture
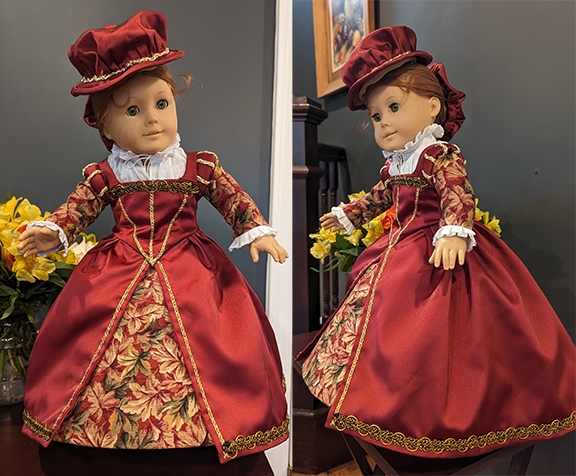
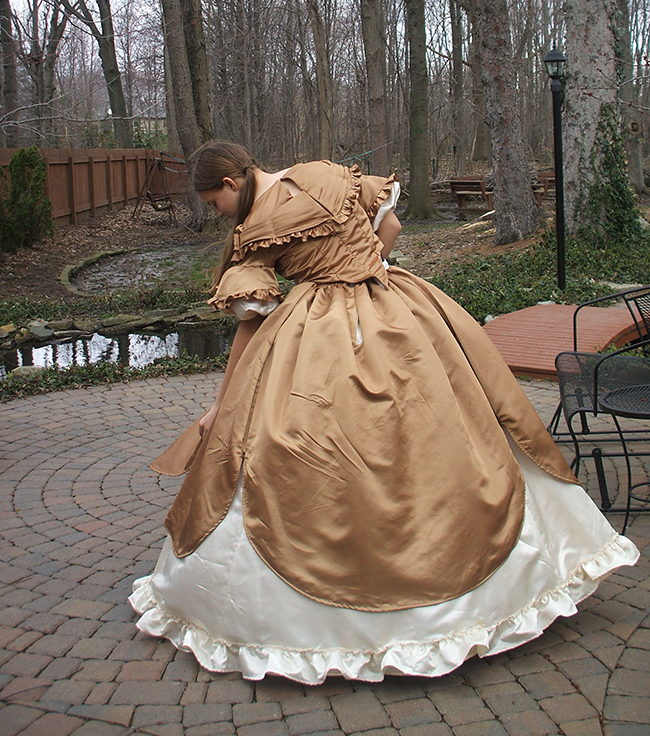
Here are some views of the other gown.
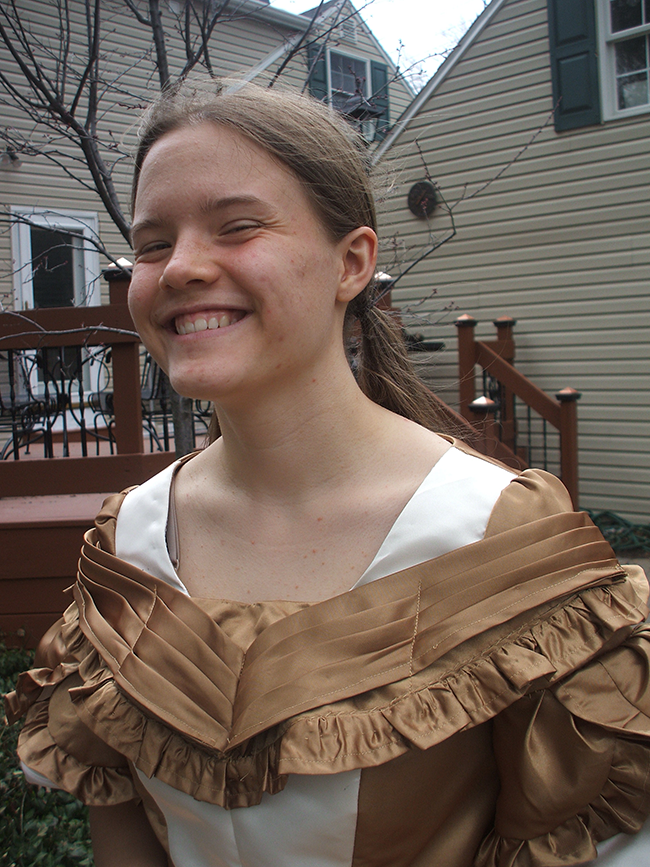
And some close-ups and other views of both gowns and underpinnings. 

Notes about Issues I Ran Into

  • Gown. The sleeves on the gowns are tight. They just baaaarely fit.
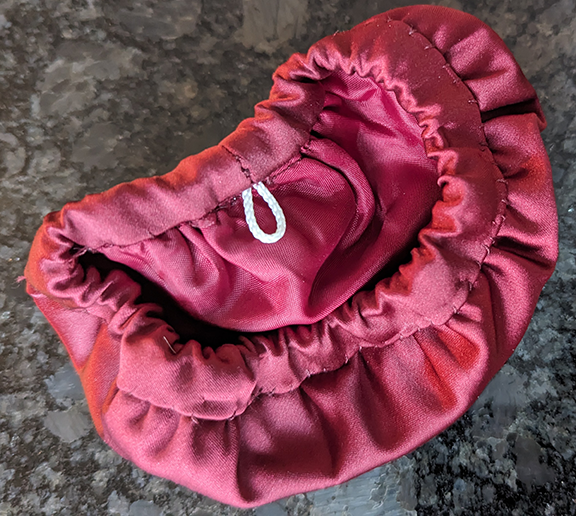
  • Snoods. The snoods would not stay on the head without additional technology. The pattern includes a loop of string on the inside through which you'd thread a bobby pin to secure the snood to the hair. I put in 2, and it wasn't useful. I had to open the band and thread through elastic. 
Picture
  • ​Farthingale. My fault for not checking before sewing up the farthingale, but it was too long for the gowns. To shorten it, I rolled the top band down double and reinserted the elastic. It looks a wee bit wonky, but so it goes.
  • Bonnet. My fault again, but you're supposed to sew a piece of twill tape around the inside seam to hide the seam and give the hat some structure. I didn't have 1/2" twill tape, but I had 1/2" twill trim. It did seem a bit flimsy, but I figured it would be okay. It's not. It's pretty droopy. So it goes. 
  • Lattice Pattern. I made the lattice pattern on the black petticoat, sleeves, and snood using metallic thread. I had trouble at first using regular weight bobbin thread and regular tension on the machine. I searched YouTube for help and learned to use very lightweight bobbin thread and looser tension and then it went smoothly. I did one very important thing differently than was indicated in the instructions. The pattern has separate pieces for the snood, petticoat front (a triangle shape), and the individual sleeves, each with their own lines for the lattice which you're supposed to follow. That means you cut out the pieces, and then sew the lattice on. That seemed pretty stupid to me. The instructions even warn you you're going to have smaller pieces once the lattice is sewn on, plus what a chore to work on the tiny pieces. I sewed rectangles of lattice and then cut the pieces out.
One thing that's funny about these patterns is that the gown and petticoats are LINED. Not only that, but the bodice is lined with cotton, like the doll is a real person and needs to wear cotton on her torso. Anywho.
One final thing. Look at these teeny tiny sleeve rolls!
0 Comments

Folkwear Dirndl

9/7/2023

0 Comments

 
Picture
I joined a new orchestra, and a couple weeks before rehearsals started, I got an email about a volunteer opportunity to help the orchestra. We could work shifts at the Cleveland Oktoberfest, and the money we earned would go to the orchestra. So I signed up.

A couple days before my shift, I got the idea to make a dirndl to wear. I found the Folkwear costume online, got the pattern printed out at the Office Depot up the street, and started to work. 

I found everything I needed in my stash, from the fabrics—purple corduroy for the bodice, the flower lawn for the skirt, and the linen for the shirt and apron—to the 6 hooks and eyes and 1/4" boning. Boning. I had boning in my stash.

I only had a couple days, and not full days either, to work on it. But I thought I could maybe just do it.

Nope. I worked my shift in a comfy jersey superhero dress.
Picture
I spent all of one day, surely 8+ hours, and half of the next working on the f--ing bodice. I made three muslins. I tried to adjust the fit my way, but the resulting muslins were disasters. Then I tried it the way the pattern instructions suggested, and thought I had nailed it.

After making my own 1/4" bias binding, sewing it around the neckline and armseyes—one side of which was by hand for Pete's sake—gathering the skirt, and sewing on all those frigging hooks eyes, I discovered the fit of the bodice totally sucked. 
Picture
Jeez, just look a this!!! It's so maddening!!!
Picture
Before realizing the whole effort was a disaster, I had had a couple epiphanies on this project I was so proud of.
  1. I sewed them hem of the skirt before I sewed the side seams. God, it was so much easier to control the fabric and get an even seam! I left enough unsewn at the sides to be able to sew up the side seams and then finish the hem.
  2. I didn't want the poofy sleeves of the Folkwear patterns blouse. I wanted fitted sleeves. So I was looking through patterns and looking around my sewing room,  and then it dawned on me what I wanted was pretty close to the chemise I sewed for my Jane Austen outfit that turned into my nightgown and that then finally ended up in a bin for refashioning. I shortened it and added a ruffle along the bottom, and ta da! I had a blouse like I wanted and a petticoat.
  3. I sewed the gathered skirt to 1" twill tape and then attached the twill tape to the bodice. This was brilliant, worked like a charm, and will be duplicated whenever appropriate. I got the idea when I was thinking how uncomfortable the waist felt to me when I was to wear a gathered skirt. I realized you sew right sides together and then the fabric falls back on itself, doubling the bulk at the waist. Then the twill tape occurred to me. It was a billion times easier adjusting the gathering along the length of the tape than doing it without the stability of the tape or when pinning it on the bodice. I had a nice long, straight, stable place to work instead of cramped on the inside of a round bodice. 
Picture
Picture
Picture
​​Yeah, so I don't know what I'm going to do. I could take a couple darts out of the neckline at the gussets and maybe make it wearable for my next shift at Oktoberfest. If I get time, I might try to make another bodice. At least it would be easy to take the skirt off and resew it because of my twill tape trick.

One thing I will do differently is either sew a zipper in, because why the heck not? Hooks and eyes? Sheesh. Or sew a pattern with front lacing. That way, I could have some flexibility with fitting, pulling the laces tighter if I needed it, or loosening them if I needed that. Like this:
Picture
Update 8/25/2024: I fixed it in time for this year's Oktoberfest! I undid the middle closure, removed 1.5 inches from each side by folding over, and added grommets. It's not perfect, but it's a costume, people.
Picture
0 Comments

Regency Madness

5/31/2020

0 Comments

 
I learned in February that my community orchestra's next concert--in May--was one at which the orchestra members were invited to dress up as some movie character. Hello! I knew right away I would go in a Regency outfit, some Austen female, who knows which  (i.e., older, younger, married, unmarried, home wear, ball wear...). 

Back then I was sane and I didn't consider...for long anyway...making my own dress. I went onto Etsy and found one for only $100. The seller would make it to my measurements. I bit.

But I started reading up on Regency clothing. You don't just wear a dress, you need underthings. A petticoat. A chemise. Stockings. At least! So I decided I could at least make a chemise. Thus began the Regency madness that has so far produced a chemise, stockings, stay, and petticoat. Of course, sometime in late March it became clear there would be no concert. But I was already on a mission. 

Chemise: Simplicity 8579

Picture
​And I got started. I used Simplicity 8579 for the pattern. I read a few blogs and watched some videos about making your own pattern (one of my favorite's: Bernadette Banner's) and saw that it was not, in principle, hard to measure out the pieces. However, I had purchased this pattern for the stay (more on that story below),  and the chemise pattern came with it. No brainer, I'm not measuring out my own pieces. This was super easy. I did imitate some techniques used in Bernadette's video--I flat-felled all the seams and added a strip at the front into which I sewed the ribbon that tightens the front.(I did not hand sew!) I made it out of the same linen I used for my Archer beach cover up. I just love that fabric, and I love my chemise! I wear it to bed every night now, as is clear from the wrinkles.
Picture

Stockings: Jalie 2448, Altered

I bought some stockings on Etsy. Too small. Bought a larger pair. Too small. So I decided to make my own. I had a Jalie pattern that might work. I made up a pair, but the seams went down the sides of my leg. So I adjusted the Jalie pattern (cutting the mockup sock where I wanted the seam, cut out a new pair using the mockup as my pattern, and sewed them up. They fit great and are comfy.
Picture
Picture
I did try another pattern. It is generously made available free by Dreamstress. Hers look perfect (picture below), just like what I wanted, so I sewed up a pair and I just didn't like the lack of form on my foot. I did these after the Jalie version, so I decided to just use my modified Jalie's instead of perfecting my Dreamstress mockup. The picture below is Leimomi's version of her stockings.
Picture
The Dreamstress's version of her stockings.

Petticoat: Laughing Moon

Picture
The chemise was easy...so how hard could it be to make a petticoat? So I made that next out of a light cotton (voile?) that I had originally purchased for the chemise when I couldn't find inexpensive linen. This pattern was super easy to follow and it came together perfectly. 
Picture

Stay: Redthreaded 1810-1830 Long and Short Stay 

Picture
But then I realized what is the point of a gown and a petticoat if you don't have the right foundation? According to my sources, the stay would be required to give the proper silhouette, as they say. 

First I bought the wrong stay pattern--the Simplicity 8579 above that I used for my chemise. Late 1700s not 1810. Got to keep my centuries straight. I thought I could adjust it to get the 1800s look. I made a mockup and realized it was not happening. Then I returned to the Internets and found Redthreaded and a beautiful stay pattern for the 1810-1830s. It blows my mind sometimes what a myriad of niches are thriving that are either made possible by the Internet or made easily discoverable by the Internet. Anywho.

​I made a muslin. Oh god these are work. Boning (zip ties) for the straight lines and spiral steel for the curved lines, the lacing, the busk. From the muslin, I had a rough idea that it would work, so I made the real thing. And it turned out pretty nicely.
Picture

Oopsie, my maid did not do the lacing very nicely. Oh well, next time.

Gown: Purchased Custom-Made for Me

And here is the purchased dress on top of all of it. I bought the gown on Etsy from Florentina Costuming. She did a beautiful job. Please ignore the wrinkles. I was too lazy to hang the dress up properly—obviously—or iron it after discovering I really should have hung it up.
Picture
Picture
Picture
Picture

Next: Sewing My Own Dress

As pointless as all of the activity has been and will probably ever be, I still want make at least one of my own dresses. My plan is to use one of the following patterns. If I get some nerve, I will try something from the Regency Wardrobe by La Mode Bagatelle. If I chicken out, I will use the Simplicity.
Picture
Look how many outfits you can make!
Picture
Picture
0 Comments

Simplicity 5724 and 9764 Civil War Ballgown

4/12/2013

2 Comments

 
Picture
Oh, mercy. This was a project. So my daughter is a junior in high school. When she was in eighth grade, I made her a Civil War ballgown. At the middle school, there is an annual Civil War ball. There are a lot of educational activities surrounding this event. It's pretty cool. Most kids dress up. Boys in Union or Confederate uniforms, girls in ballgowns. (Although when my son went the next year, he dressed as a Civil War-era gunslinger, a la Angel Eyes in The Good, the Bad, and the Ugly.) 

This ball has been going on for about 20 years, so there are actually a few costume shops in the area that have everything a costumed participant might want to wear. For cheap. But noooooo. I had to jump in and beg to make her gown. She was game.

I settled on these Simplicity patterns, one for the dress and one for the hoop skirt that goes underneath. We went to Joann's and found these polyester satins, one a copper color and the other cream. I got some cotton for the hoop skirt. I'm not sure what it was, maybe batiste. I used it to line the bodice, too. I ordered hoop wire for the hoop skirt and boning for the bodice, which I didn't use. I ordered 1" twill tape for the hoop-wire casing. It came on a big roll and I have about 2 miles left of it still.
Picture
Picture
It was wearable in the end, but there were so many disasters associated with this dress I want to tear my hair out just remembering. I started about four weeks before the ball. The hoop skirt turned out great. My daughter did not want her shoulders to show, so I had to improvise the bodice. It took a while to get it to work. I did use the sleeves from the pattern. I muslined them, the bodice, and the bertha. The sleeves and bertha looked great, and the bodice seemed fine. So I moved on to the fashion fabric.

Things were going fine, but I was just running out of time. Somehow, everything seemed to be taking so long! I ended up taking off two days from work, I worked several times straight through to about 4 am. It was insane. The day of the ball I put the whole shebang on her only to discover it was a foot too long. I still had not figured out or finished the closure of the bodice or the bertha. I still had to do her hair. Oh, and I had not bathed in about a week and I was supposed to go as a spectator to the ball, too.

There was a ruffle on the bottom. I took it off. I slashed the hem. Unfortunately, I was a bit wild at that point, and  the job was not very even. I sewed the hem and as I was finishing that, my mother-in-law, who had dropped in unsuspectingly to check her grandaughter out and snap a photo or two, was set to the task of basting her into the bodice and bertha. I finished the hem and started to fix my daughter's hair. Fortunately, we had practiced before, and I could do something quickly that looked quite nice.

With 15 minutes before the start of the ball, my daughter was ready. My mother -in-law came to the rescue again and offered to drive my daughter to the ball while I showered and dressed.

I got to the ball in time to see the beginning of the event. I guess the kids had to get there early (or maybe I missed something I don't know about). The festivities began with a procession of the students into the gym. (Spectators were in the bleachers above them.) I saw my daughter in her dress walk in and stand on the gym floor in a row for about ten seconds. Then all the students sat in the bleachers. First there was a play. Then there was a reenactment of an army drill. There was a poem and three student violinists playing Ashokan Farewell. They were awesome. Then, about half the students rose and danced a waltz. They sat and the other half got up. My daughter was among them. She danced for about three minutes. She sat. That was that. OMG sometimes reality hits you doesn't it? Three weeks of intense obsessive insanity for five minutes of viewing pleasure. Why, why, why did I not rent a costume?

Okay, I did have fun up to about the last week, and I did learn some things (like never make another Civil War ballgown!).
Picture
UPDATE 2020! I recovered some photos off a camera and found pictures of my daughter modeling the dress after I'd fixed the hem and put the ruffles on the skirt and bertha. I ulimatedly removed the stitching I'd added to the bertha because it looked hideous. It looked good once it was gone, but alas, no photos of that.   
Picture
Picture
Picture
Picture
Picture
Here is a photo of a hoop skirt--not mine--but mine really did look just like this. I am sure I have a picture somewhere. When I find it, I will switch it in.
Picture
So what to do with this outfit once the ball was over? I kind of knew all along that if the dress turned out passably wearable, I would donate it to the school. Or try to. I didn't know if anyone would want it.

It sat on my dress form (Gertrude) for some time before I could summon the energy to straighten out a few things before contacting the school. But eventually I got more tired of walking around it (and knocking over Gertrude periodically).

I undid the hem and made it even. I had to repair a couple places that were too short (!). I put the ruffle back on. If you look closely at the sleeves there is a row ruffle along the edge. I added that same ruffle to the bottom of the bertha. I put a zipper in the bodice and hooks and eyes on the bertha. I marked the skirt and the hoop skirt with an embroidered "F" to indicate the front of each (since the hoop skirt closed in the front but the gown skirt closed in the back (by the way the pleating on that skirt was fabulous; it looked like something Melanie from Gone with the Wind would wear!). Then I sent a note to my daughter's awesome history teacher. She said she would be thrilled to have it. I boxed it up and took it to the office. Arrividerci Civil War ballgown. I do wish I had taken some pictures of it on somebody. I did take some on Gertrude. I must find them. 
2 Comments

    Author

    I am a wife and mother. I am retired: yay! 

    Archives

    April 2025
    March 2025
    January 2025
    November 2024
    August 2024
    July 2024
    June 2024
    May 2024
    April 2024
    March 2024
    January 2024
    December 2023
    September 2023
    February 2023
    January 2023
    December 2022
    November 2022
    October 2022
    September 2022
    August 2022
    July 2022
    November 2021
    October 2021
    March 2021
    January 2021
    December 2020
    September 2020
    July 2020
    June 2020
    May 2020
    January 2020
    December 2019
    October 2019
    September 2019
    January 2019
    July 2018
    May 2018
    March 2018
    February 2018
    January 2017
    March 2016
    April 2013
    March 2013

    Categories

    All
    Bags
    Costumes
    Dresses
    Home Decor
    Outdoor
    Pants
    PJs
    Quilts
    Skirts
    Stuffed Animals
    Tools
    Tops
    Toys

    RSS Feed

Proudly powered by Weebly