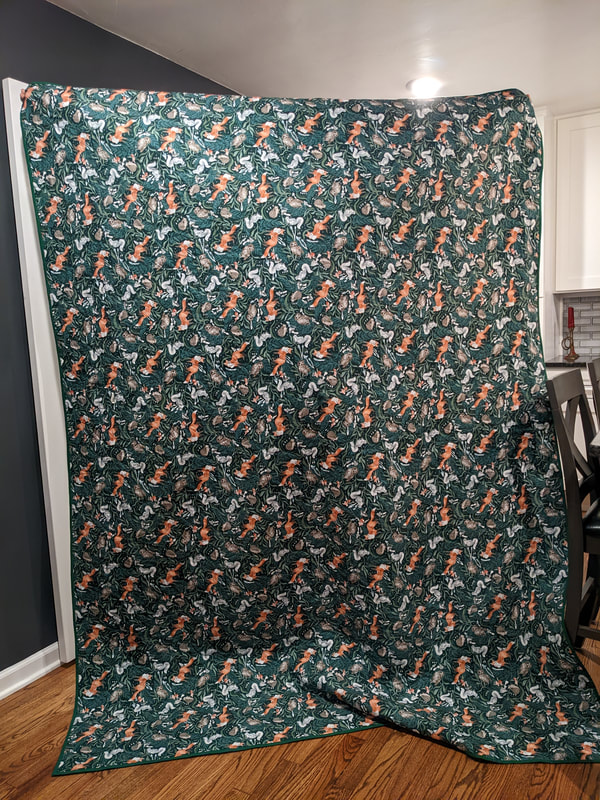
Front.

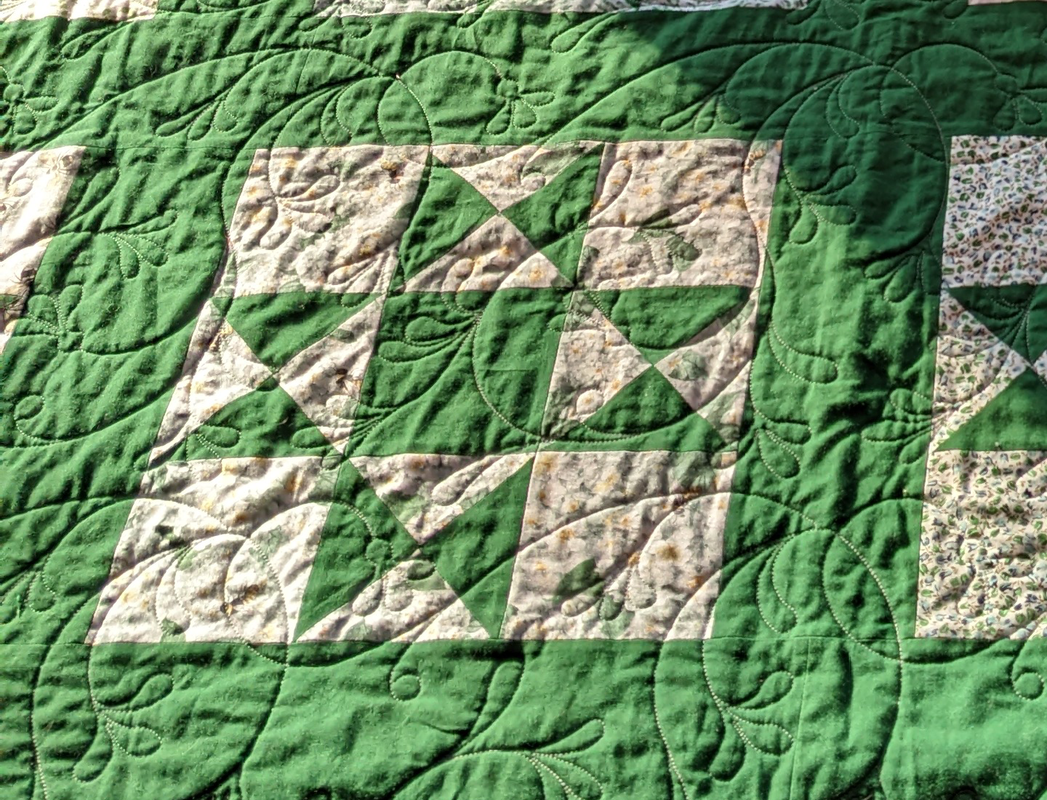
Back.
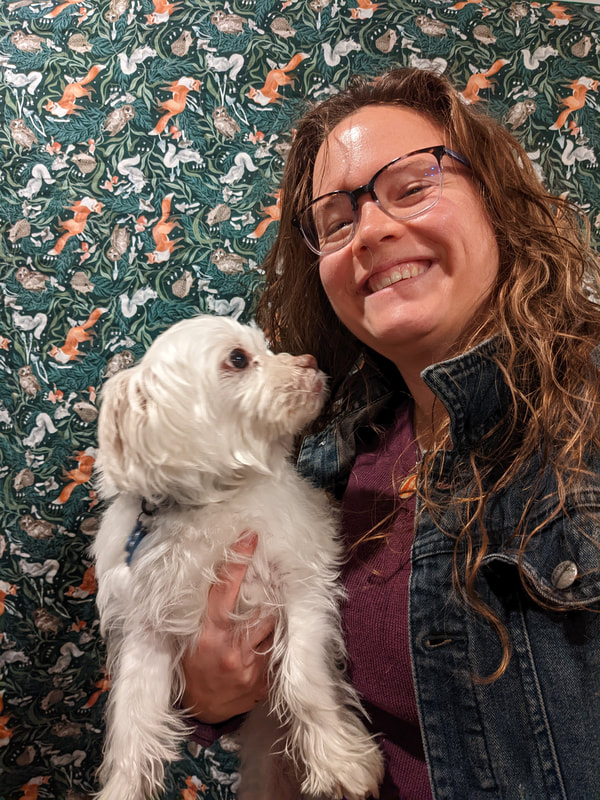
Closeup of quilt backing, pleased recipient, and The White Ingrate.
Quilting pattern was called "Persian," I think. I really love it. Thanks, Quilting Bee!
| Reusserland |
|
|
Front. Back. Closeup of quilt backing, pleased recipient, and The White Ingrate. Quilting pattern was called "Persian," I think. I really love it. Thanks, Quilting Bee!
0 Comments
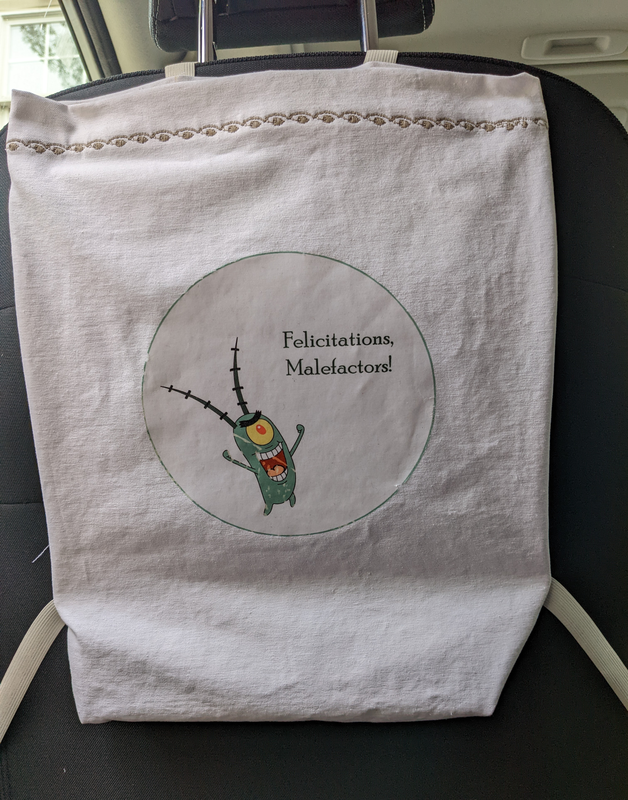 It's not perfect. Mishaps occurred in the making, as per usual, but it will serve its function and I think it's amusing. I have been thinking I should get a car trash can. Then I saw someone with a nice one that hung over the back of the driver's seat. Hers is tubular, compressible mesh. I went searching at Amazon, but couldn't find hers exactly, and I didn't really like what I saw. Then I had an idea to make my own. Just a cloth bag with some way to attach around the seat. As I was searching for fabric, I remembered this white twill I had left over from my Regency stay project. I had plenty. Next the straps turned into elastic, which I first thought I'd stretch into place, but then I realized cutting each strap in half and attaching Velcro would be much more practical. With all that white, I realized I could put some design on. At first I thought applique, but then it seemed like so much work and I had no good ideas for design. And then I got the brainstorm to do an iron-on transfer.  I had just done one for my daughter, a shirt for her birthday. It was a dark Carhartt's shirt, and I used my last dark iron-on transfer sheet for it. I put this image from Over the Garden Wall on it. That one turned out really nice. 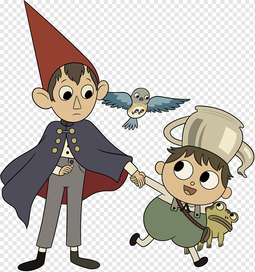 I'm trying to be good and read and reread directions, but at some point I just lurch forward and do something, and inevitably one of those somethings is done wrong. This time, I put the sheet onto the fabric wrong side up and hit it with the iron. That's why Plankton has a slash across his body. 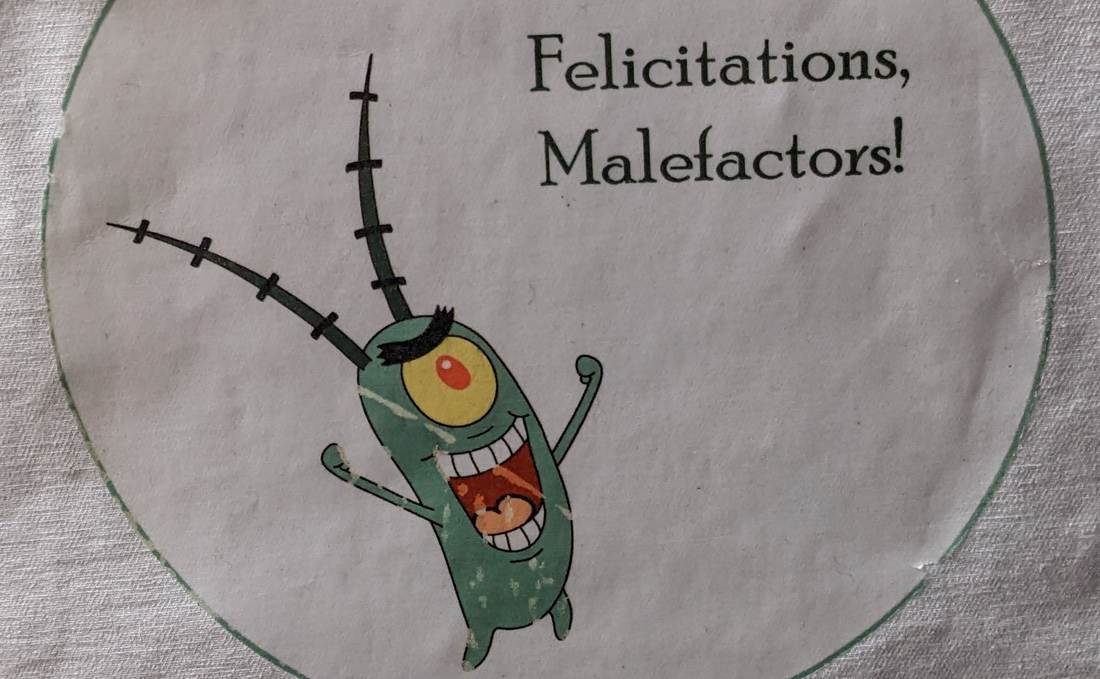 And, I suppose if I'm cataloging mishaps, I should mention the edges of the transfer were hard to peel off, and I tore them here and there. Live and learn. The dark transfers are done with the design face up. With the light transfers, you have to flip the image so you can iron it on with the image on the underside of the sheet and the iron on the top of the protective paper. Even after struggling a bit to figure out how I would flip my image before I printed it, I completely forgot about putting it onto the fabric so I could read the writing. At least it didn't completely wreck it. Why didn't I just start over and make a new transfer? It's only occurring to me now that I could have. I guess I was in a state of mind from my daughter's project in which I thought I was working with the last sheet of transfer paper. Alas. Anywho. I got the idea at the last minute to add a decorative stitch around the top. Just for fun, see what the machine could do, play with it a bit. Eh, it's okay. I hope I won't regret that it is white. I should put some kind of liner in I guess. 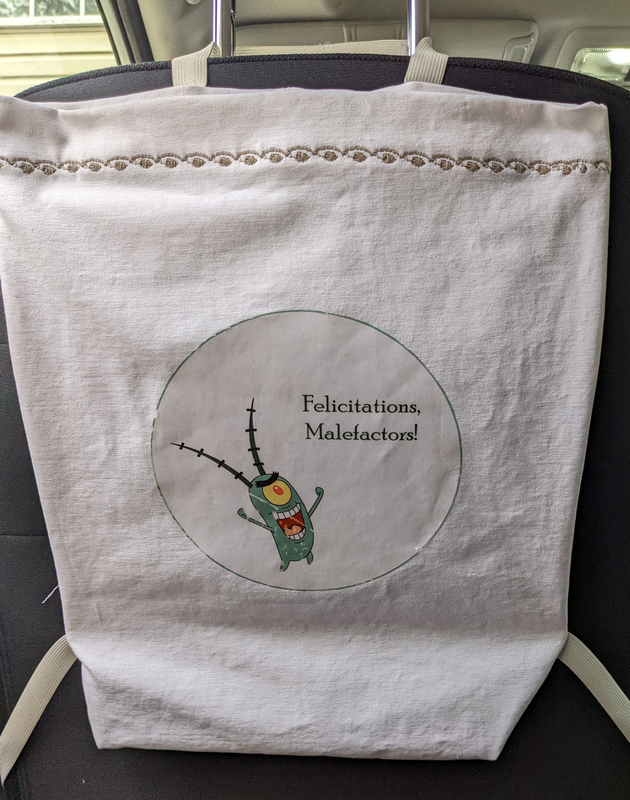 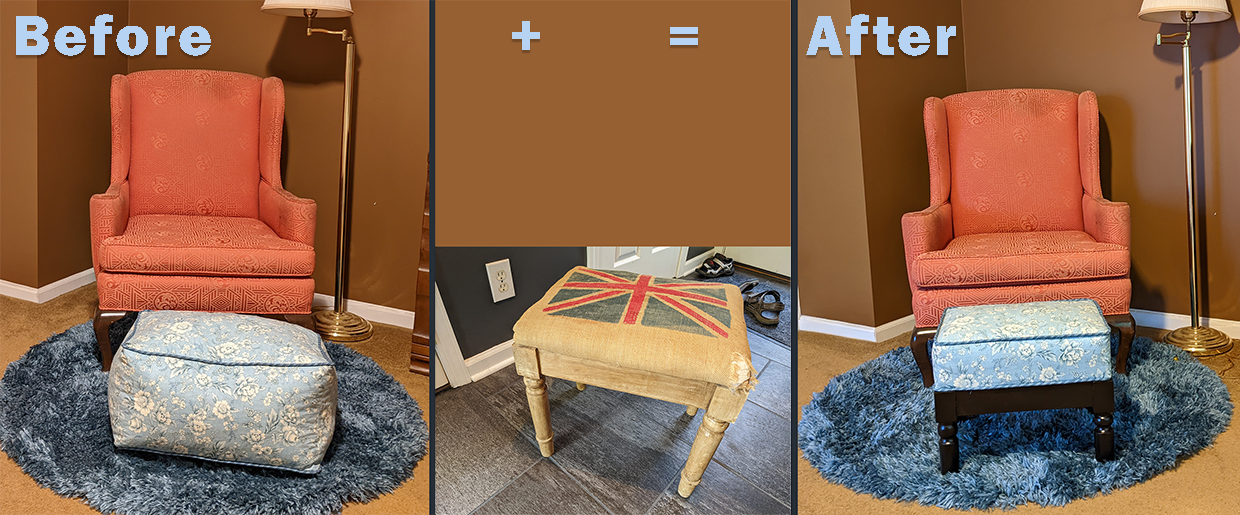 Back in May, I updated our bedroom. I got the idea from one of my sisters who refinished and decorated a bedroom in my dad's house after moving back temporarily after a breakup. It looked so cute! It really hit me how much a pretty environment affected my mood. Our bedroom was pretty bare and unattractive. We had a couple dressers that were my husband's as a kid, a couple nightstands with the lamps from his childhood bedroom, a bed with a mission-style headboard, and a couple of tall and cheap bookshelves. The only decorations were a mirror above the long dresser, a print of a boat and lake above the bed, and a watercolor of a barn that my mom had painted. We did have blinds on the windows but those were never pulled down. I got rid of one of the bookshelves; it fell apart as I moved it. I got rid of one of the dressers. I hung iron-like rods and long, flowy, gauzy white curtains that I got cheap from an outlet store. Then I went to TJ Maxx and got fake flowers and new bedside lamps. I grabbed an old chair from my parents' house--there is an overflow of furniture in that house--and a lamp from my daughter's old bedroom. I added a rug under the bed from Home Depot. The room was looking much more cozy. Next came a blue shag rug from Rugs.com. 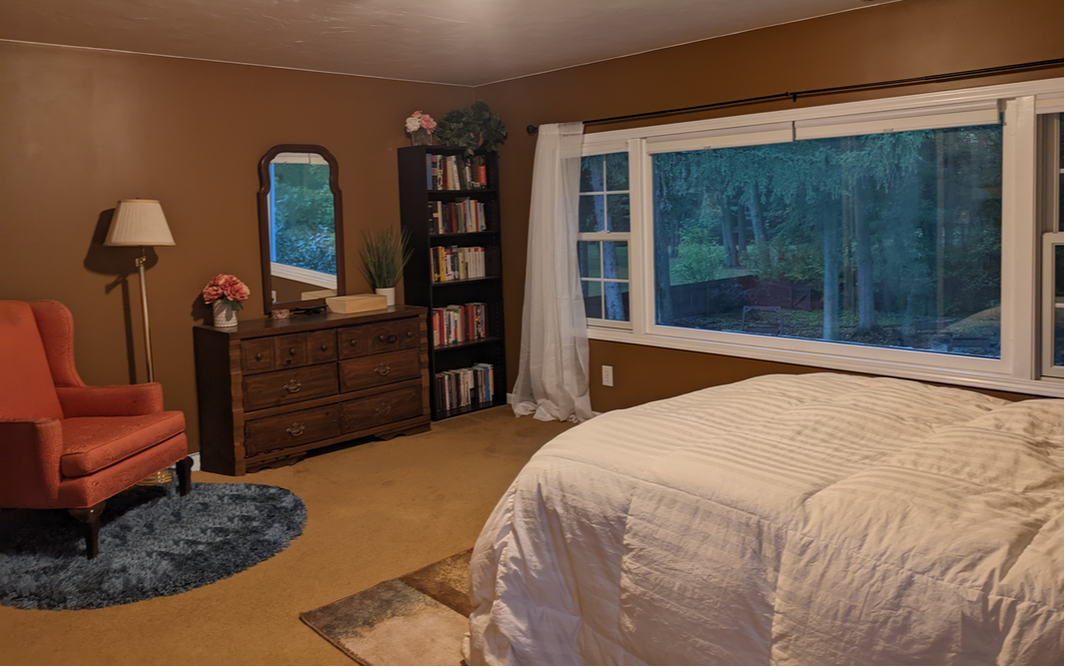 Finally, I wanted a footstool in front of the chair. What I really wanted was a proper classic upholstered wooden footstool. 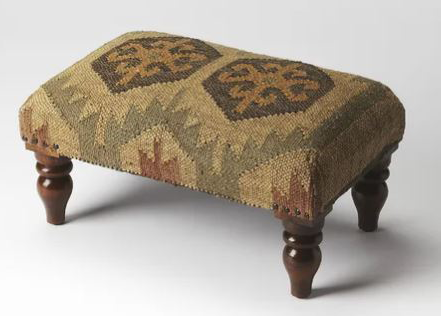 But what I saw at TJ Maxx were poufs like this one, and and I thought they'd be okay. Only these were sick expensive and to save money I thought I could make one. 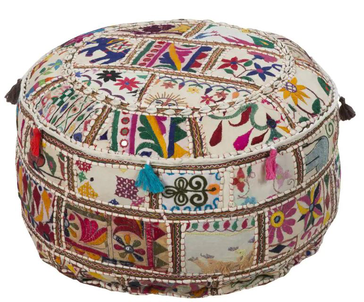 I had a nice bit of quilting cotton with the perfect pattern and another bit from which I could make some piping. The part that gave me trouble was the stuffing. I first filled it with poly stuffing, but it wasn't dense enough. Next I added bean bag chair pellets, mixing them in with the stuffing. Well, it was denser and I called it quits, but I didn't like how squishy and misshapen it looked and how much noise it made when you touched it. 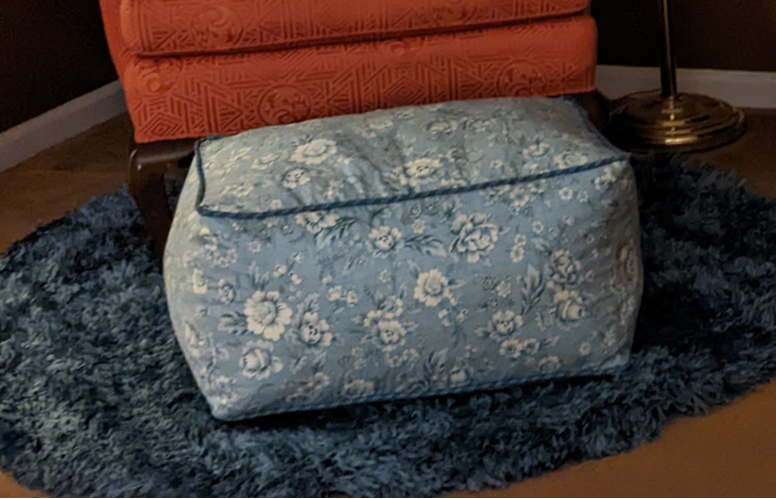 I was planning on constructing my own wooden footstool out of wooden parts from Home Depot and then refashioning the fabric into the pillow top, but I had too many project pans in the fire to get time for that. But then I passed this little find in a trash pile... 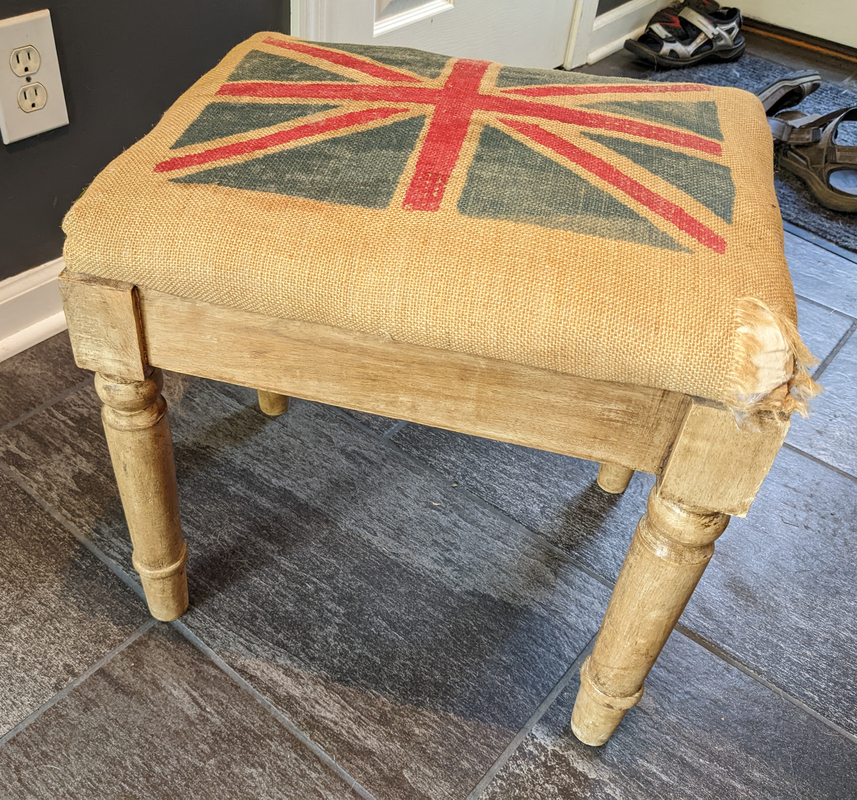 I took it apart and noted how it was put together. It was thin board screwed into the top of the frame, and on the board was a loose pillow covered in the burlap fabric, which was stapled to the board. Thin strips of batting were laid on top of the pillow to round it out, and a piece of muslin covered the burlap edges on the underside of the board, so it all looked finished and nice even though it was getting screwed into the frame and would never be seen by anyone. I began to reconstruct it, first throwing out all the cloth and batting materials because they were disgusting and dirty. I made a new inner pillow out of an old sheet, filled it with a rectangle of high-density foam, and padded it with batting. I cut up the old pouf fabric down to the new size I needed and resewed the piping to the top. I stretched the fabric over the pillow and stapled it into the board. I tacked down a new piece of muslin. Meanwhile, my husband cut the legs down for me and painted it. I woke up this morning and he asked me how it looked. He had screwed the top onto the frame and placed it in the room while I was sleeping, but I had walked right by it when I got up. It looks fabulous! 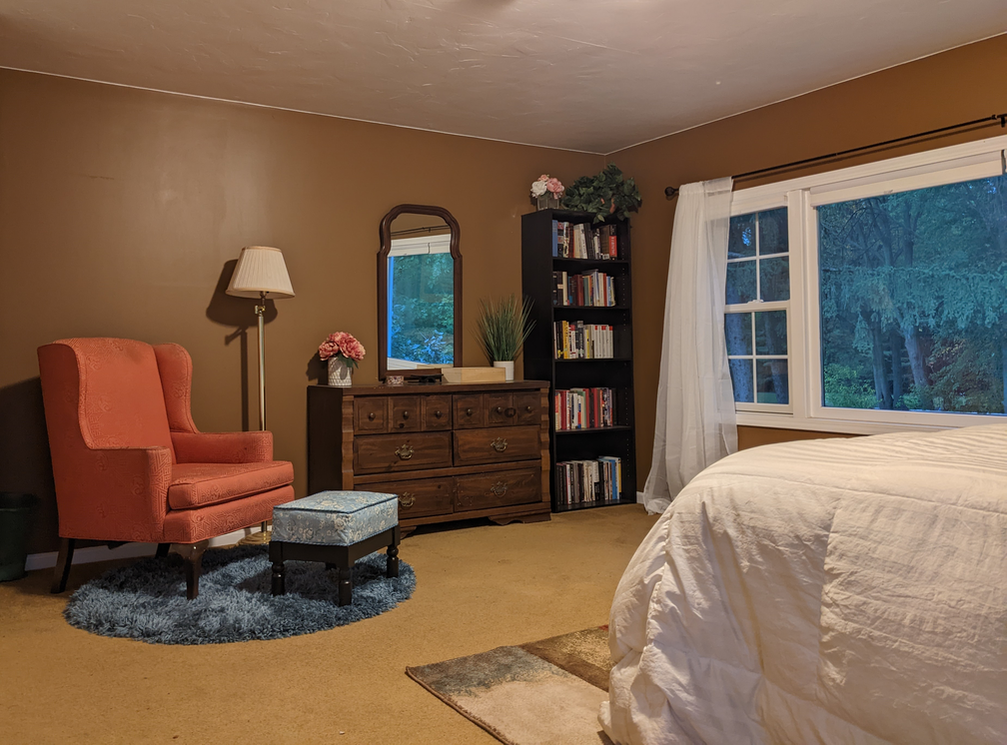 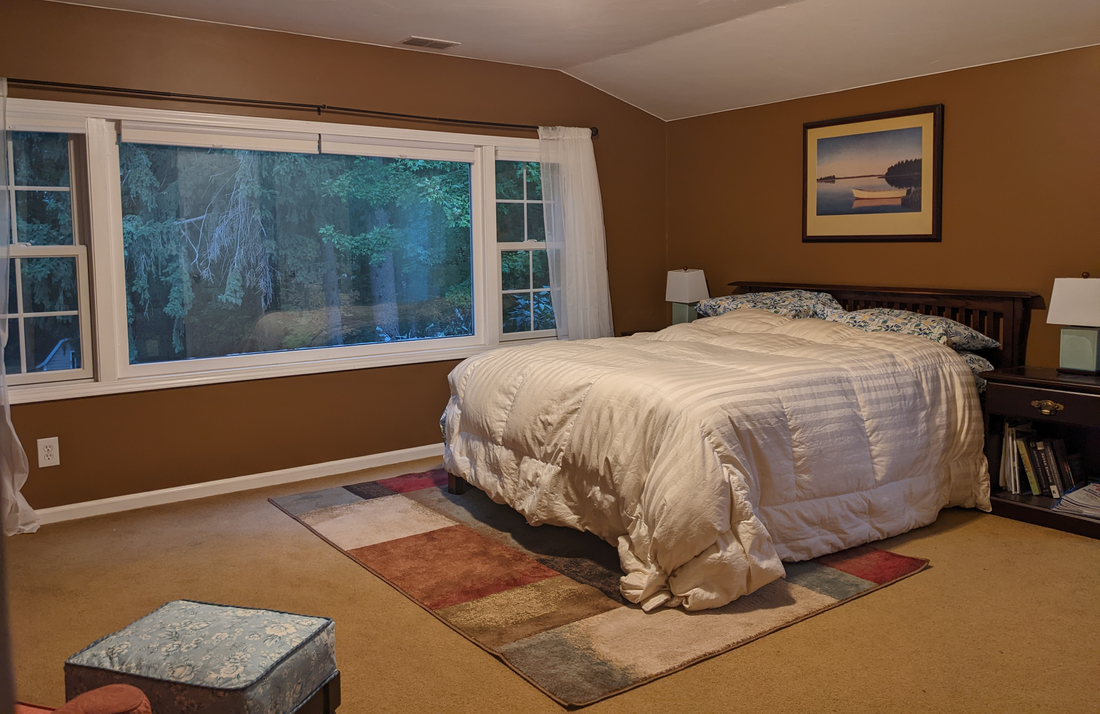 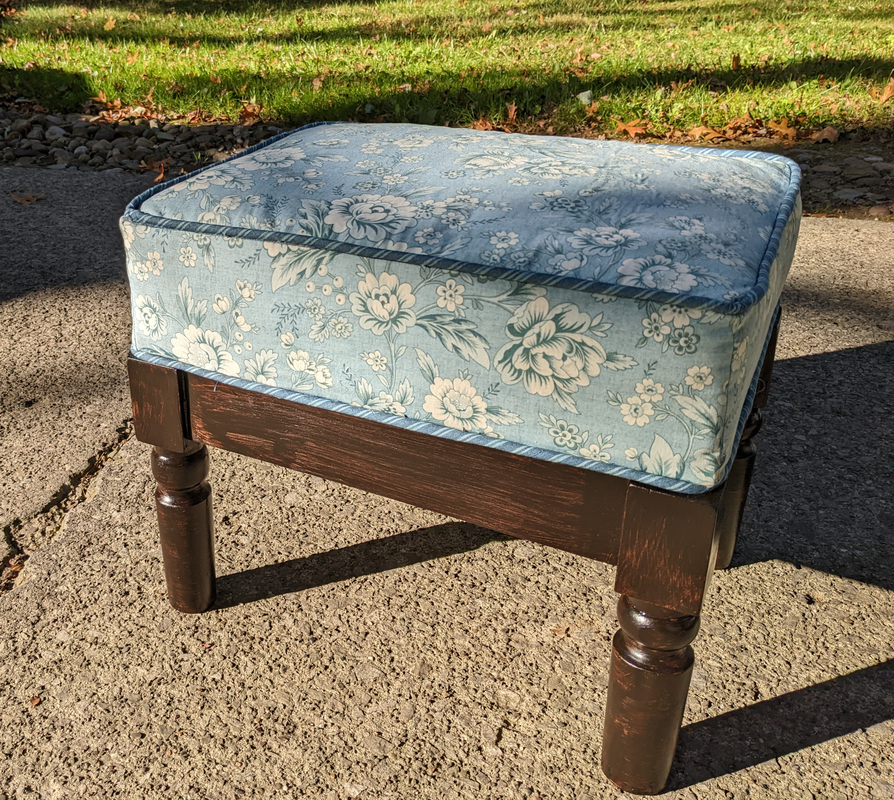 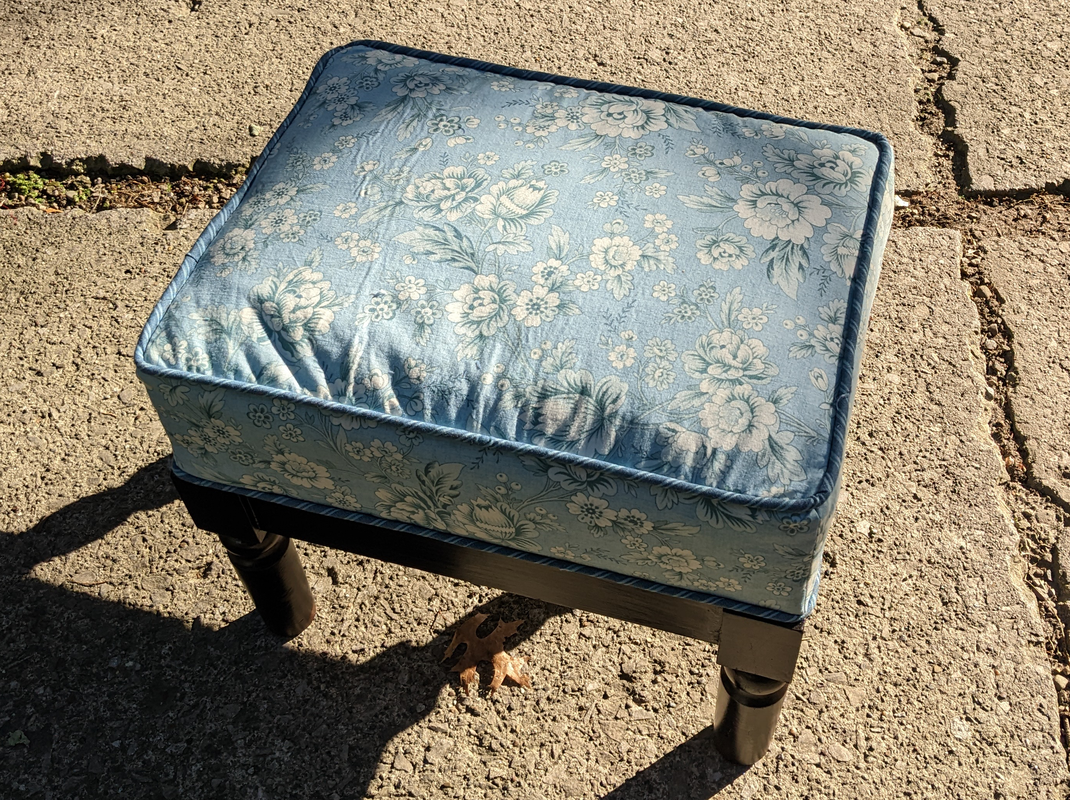 Moira's quilt is finished. I'm very happy with how it turned out. Colors are not perfect—the blues recede so much and the oranges are so overpowering. But it's still pretty. And they are the colors she wanted. 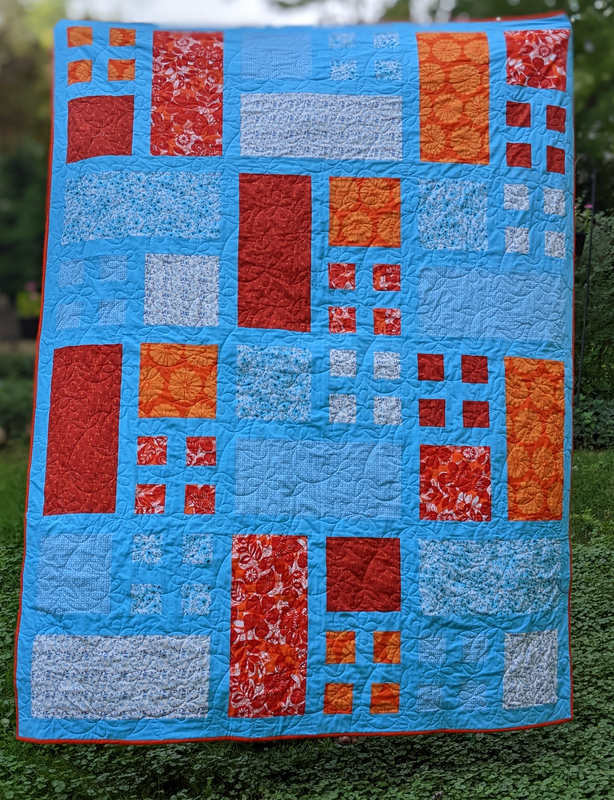 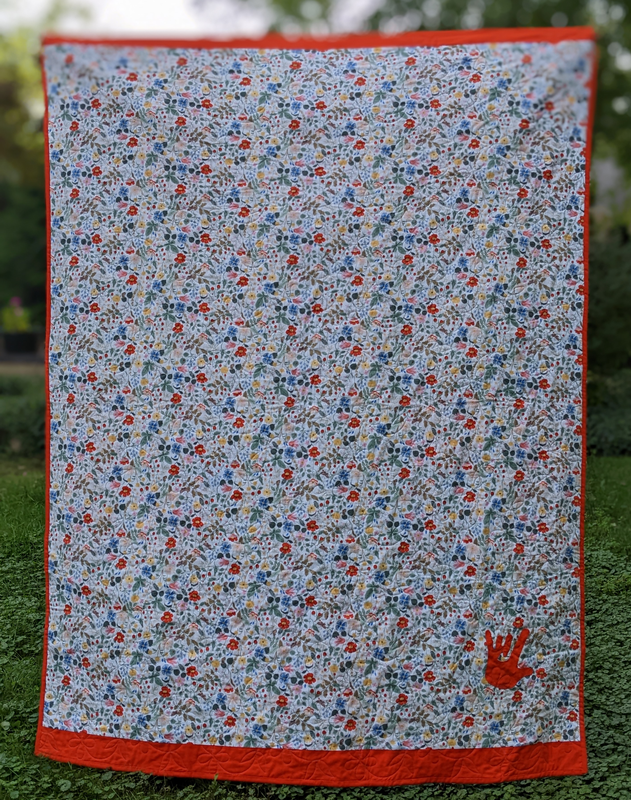 I got the quilt back from the quilt shop that did the quilting last Tuesday. As soon as I got it back, I put the binding on. I referred to a good video by Just Get It Done Quilts. On earlier quilts, I used a wider binding because the fabrics on the top and bottom did not always go 100% to the edges. A wider binding gave more flexibility to make sure everything was covered. This time, I used 2.5-inch binding as this tutorial shows, which results in about a 1-inch border. Because you fold it in half so it's 1.25 inches wide, then you sew the open edge to the edge of the quilt, and then you fold it over and sew it down. I sewed the first seam by machine and then hand-stitched the second to the back of the quilt (I think I did this backwards on my first two quilts.) Bummer is that, even though I thought I had full coverage of the top quilt edge to edge, there were two small spots the binding did not cover on the front, argh, and I had to repair those. One I just hand-stitched over but the other looked crappy when I did that. So I sewed on a patch of blue. It is not perfect, sigh, but it looks okay, as if it were an old quilt that got repaired. Suzanne at the quilt shop suggested a couple of flowery designs and I chose this one. I think it was a good choice.  Here it is in her camper! She's going to redo the color scheme on the inside to match the quilt! 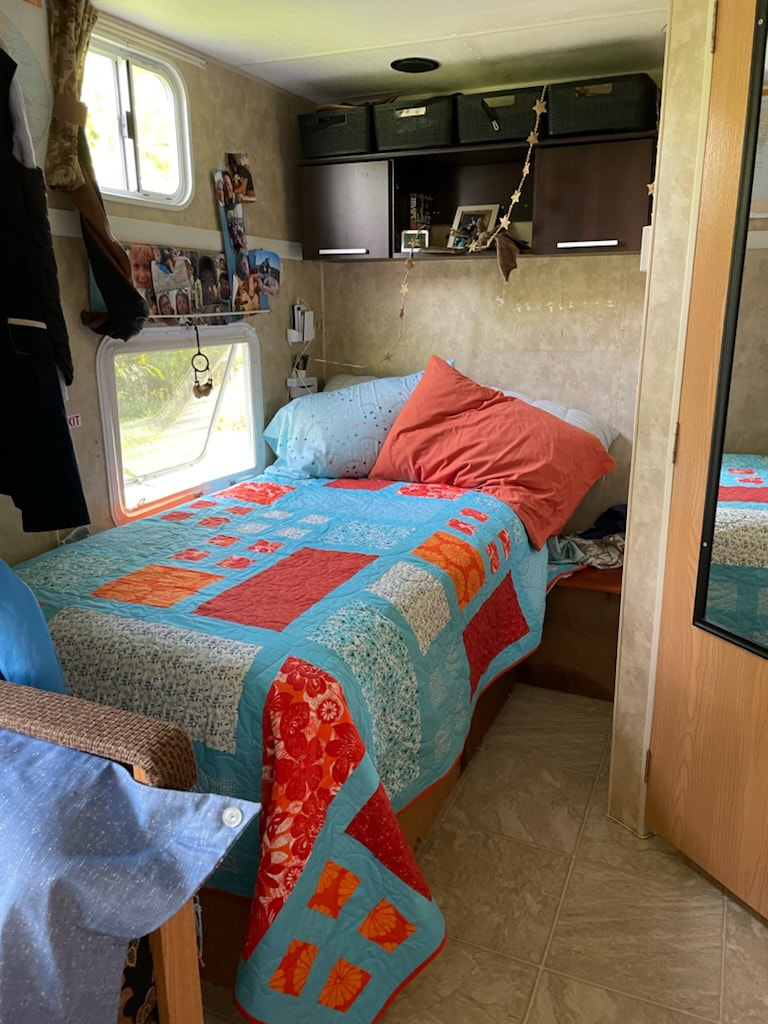 Link to the post with quilt as a work in progress.
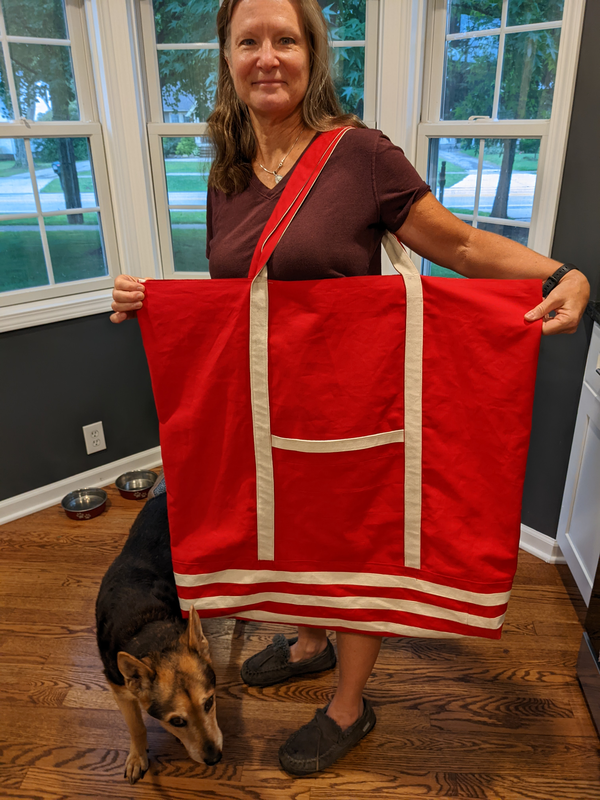 I made this kick-ass bag! Very simple to construct...if you are not me. It seems I am doomed to turn even the simplest of projects into a shit show, and this one was no exception. Still, it turned out pretty awesome. It is rather enormous...it needed to be this size...but I hope it holds up and does its job. It started like this...I bought a fence to take camping so we can let The White Ingrate hang out outside, without being tied up. 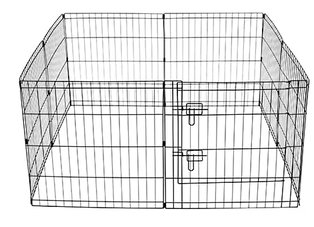  It came in a big cardboard box, and I was surprised at how heavy it was. Not awful, but heavy enough that it might be awkward to cart around. Thinking of tent- and Clam -carrying cases, it struck me that a similar bag for the fence would be nice. At first I thought I'd make a case with a zipper, but I quickly realized that that would be unnecessary and a bag open at the top would be fine. I stopped at Joann's and got some red and cream cotton canvas duck. It wasn't on sale, so I went with the minimum I thought I could get away with. At least I had measured the fence and done a little research on bag construction beforehand (two nice vids here and here), so I had some idea about what I needed. Once I got home, I proceeded carefully, nervous about the amount of fabric I had to work with. God forbid I'd have to go back and get more fabric. Not for the time, the drive, the gas, the expense, but for the embarrassment. I decided to first cut out the main panel, since it would be the largest bit of fabric I'd need to cut and if I made a mistake with it, I'd be history. I'd seen a few options for constructing the sides—cutting a front and back, cutting a side, back, and bottom panel, and adding a lining—but in the end I cut one piece for front, back, and bottom and decided on no lining. It's only for carrying a damned dog fence after all. After that, things didn't go according to plan. I needed enough fabric to make two, two-colored handles, a pocket, and a bottom reinforcement panel. (After looking at the way the handles were attached on a canvas Lands End bag I have, I saw that the best way to hide the bottoms of the handles was with a panel along the bottom, but also I thought it couldn't hurt to add some reinforcement.) But after cutting out strips for the handles, I realized I had measured them wrong. I had measured the Lands End bag handles and then cut strips out of the red and white fabric. I realized they were too narrow after I had partially constructed the first strap: I had sewed a red and white strip together (to make the front and backs of the handles), folded in the ends, and then folded everything in half again. When I compared the would-be handle to the Lands End handle, mine was a quarter inch too narrow. That seems small, but it was enough to make a big difference in how the handle felt (the Lands End handle was just 1.25 inches wide). Fortunately, I compared before sewing the folded bits together permanently. I remeasured the fabric that remained and had barely enough to cut new strips a little wider, though not as wide as I would have liked. But once the new strips were cut, the white fabric was gone and there was just a little strip of red left. I didn't have a big enough piece even for the pocket and definitely enough not for a bottom panel. But...I had two very, very long red and white striped pieces and that one strip of red. While it's just a bag for carrying a damned dog fence, I wanted that panel and the pocket, so I spent more time than a neurally normal person might have spent reconstructing fabric. I sewed and ironed the red and white strips together and ended up with a reconstructed piece just big enough for the bottom. 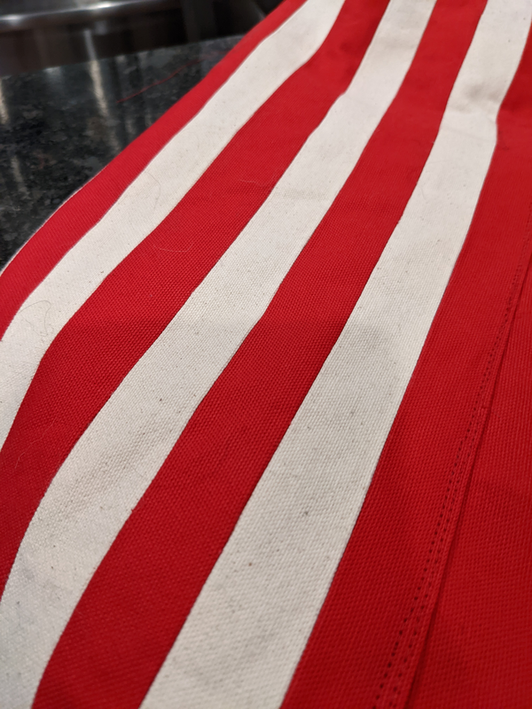 Then I cut the red remnant into short strips and sewed them together with the last cutoff of the red and white strip to make a piece big enough for the pocket. 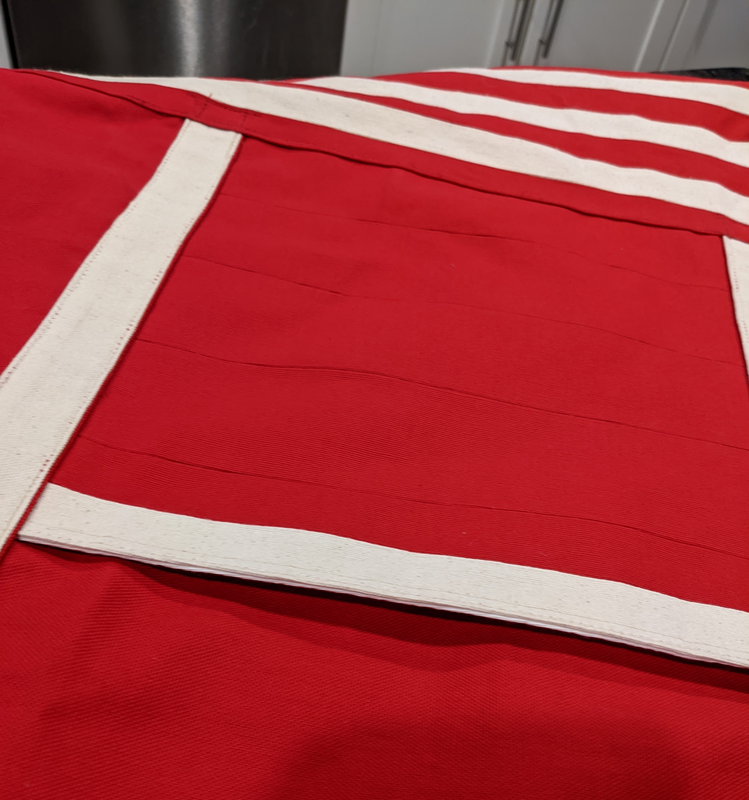 Finally, to finish the inside seams, I copied the construction on the Lands End bag and covered the seams in 1-inch wide twill tape. I have enough of this tape to last a life time left over from the Civil War ballgown project. 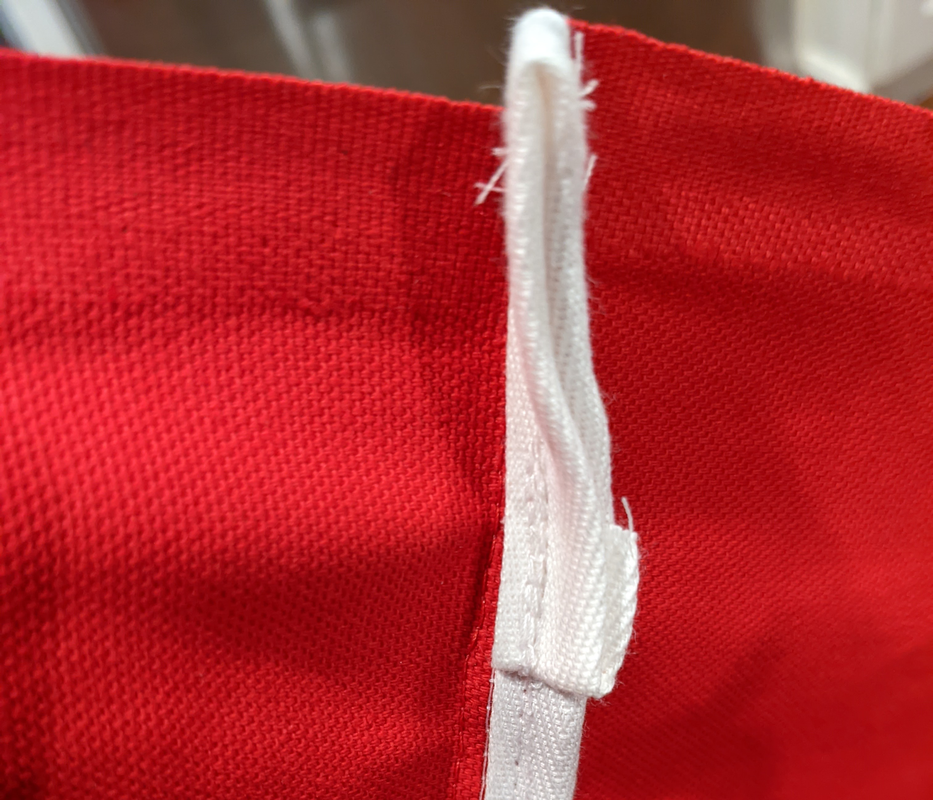 While it took about 8 hours to make this final bag, damn, it turned out sweet! 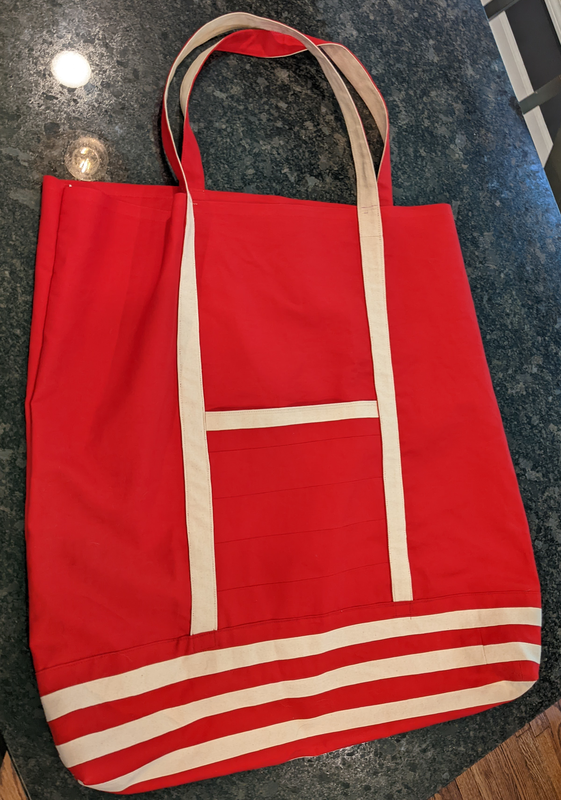 Finally, a side note about my sewing machine. I used a jeans needle, and my Pfaff Ambition 1.5 handled every seam and intersection on this canvas duck beautifully.
For the pieces, using heat and bond will be perfect. I sewed a nice blanket-like stitch all the way around the most intricate piece and it was fine. It looks really good. I bought "heavy duty" heat and bond because I'm a spaz and I didn't take my time. The result is an applique that is too stiff, even after I washed it. So I already ordered normal heat and bond. 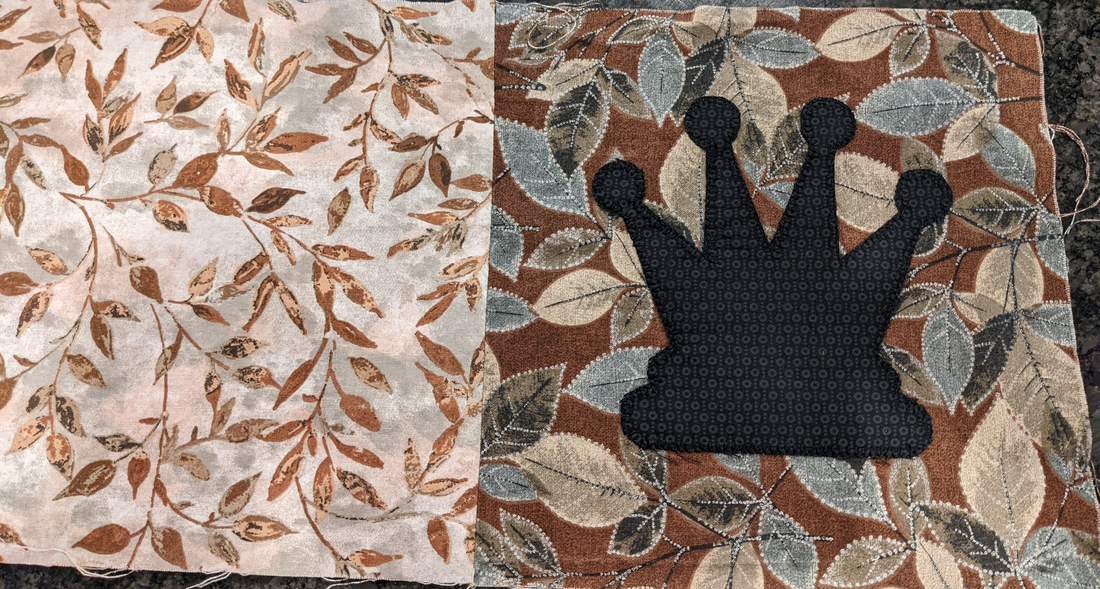 Now of course, I didn't really think this whole quilt through, as per usual. What I just realized is that because I've already completed the board, I will have to sew around each applique piece while dealing with a huge piece of fabric. I just have a regular sewing machine. It's going to be a bear...
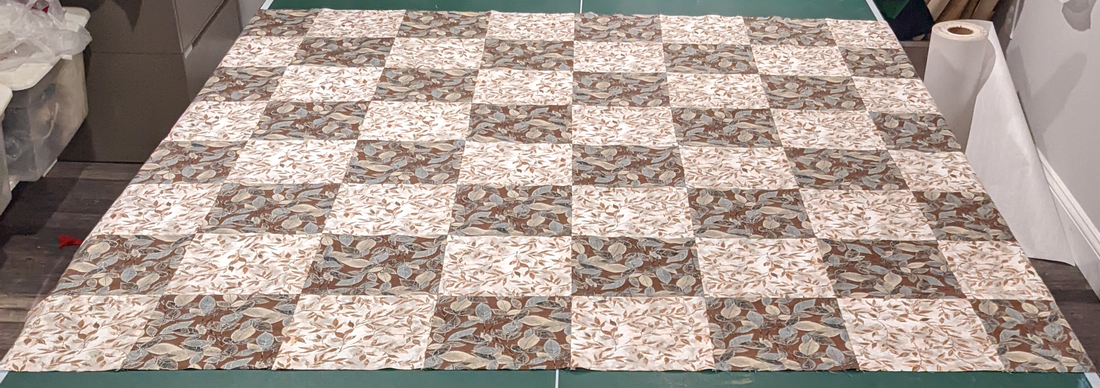 My son loves chess...a lot...and I got the idea to make him a quilt that looks like a chess board. I finished the board part. Next will come a 1- or 2-inch solid border in black or brown around the board and then another wider solid border to make it the 72" x 92" final size. Then a binding. The board went together very easily. I tried to concentrate and go slowly when I sewed the seams so they were as even as I could make them. There are a few unperfectly matched corners, but they will stay. The only tedious part was opening all the seams and ironing. Now I'm on to the pieces. And I'm a little stuck. I don't want the edges to fray and I want the pieces to be perfectly shaped. If I turn the edge under or sew a back to a front and turn, they pieces will have misshapen bits. I've tested a few and it's impossible given the shapes. For me anyway. So I will try heat bond and adhering directly to the fabric. With this method, I'm worried about how to finish the edges. Won't even a blanket stitch allow for fraying? And a blanket stitch is going to be a bitch on some parts of these pieces if I use my machine. My sister suggested doing what I can on the machine and hand-stitching the other bits. That's a good idea, I think. Here is what the pieces look like. These are my templates. I need to now find colors I like for the pieces and borders. 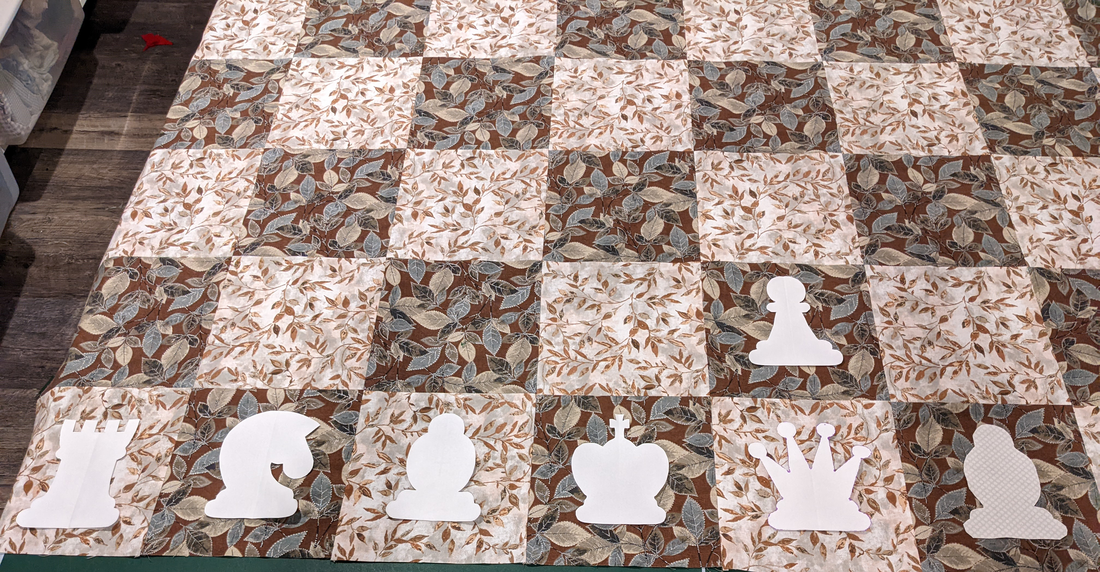 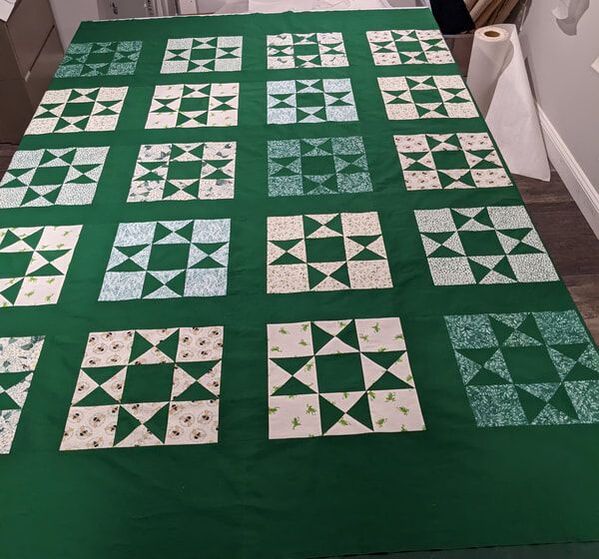 I finished the top for my daughter's quilt! I am pretty pleased with it. I did a lot better matching the points of the stars than my first time around. One thing I did differently is I made the pieces for the quarter square triangles bigger than recommended so that when it was time to trim them down, I had more room to play with. It was very helpful!!! When I had just 0.25 inches of clearance, I inevitably ended up with some squares that just couldn't be the perfectly centered into the 4-inch final size that I needed. With 0.5 inches of extra, it worked out much better. Now, I'm not saying that by the time I got to trimming the squares to their final 12-inch size that I didn't have some aggravating shortages here and there, 'cause I did. But all in all, even those were small enough that I could work with them and just have slightly less fabric on one side of the 0.25-inch seam. The second thing I did differently that helped with the matching is that I was a lot more careful about the matching! I saw a nice YouTube video by Quilt Addicts Anonymous with helpful tips and one was a way to use pins to help match points. When I ran the idea of a quilt past Thome, she said she'd also like an Ohio star quilt, and the color she'd like it to be was green. She's a nature lover, so I decided to make it out of a mix of nature fabrics. Originally, I thought I could mix it up a lot, with the light and dark squares being all different prints, like this one below. Isn't it lovely? (I copied it from Pinterest...sorry, not sure whose it is...) 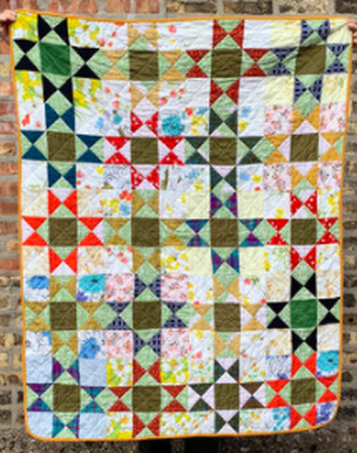 But, in the end, I felt I wasn't experienced enough (and the variety of fabrics I was seeing wasn't sufficient) that I decided to anchor the prints with a single solid for the stars and sashing. I had a dark batik in play for a bit during the planning stages, but in the end I didn't like the extra busy-ness it added (or the stiff feel of it for that matter). When I ran a couple design ideas by Thome, she preferred this dark overall look, so I went with the solid green. I used a total of 7 fabrics. I named them all so I could keep them straight during the playing-around-with-placement stage and the sewing phase. They were all the ones that worked together of those I had collected over several months. Ideally, I might have liked more, or different ones, but this is what I could find that matched the theme and color ideas I was going for. The Batik Square (not the same batik fabric I had been considering as the dark anchor color)... 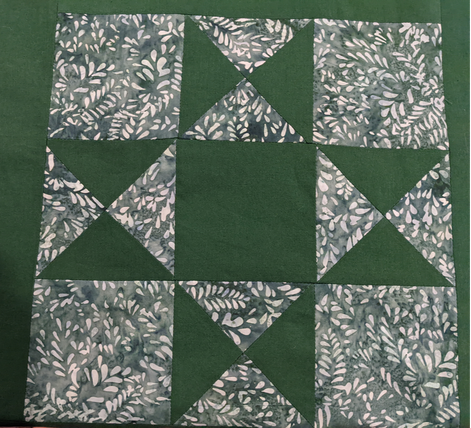 The Bee Square... 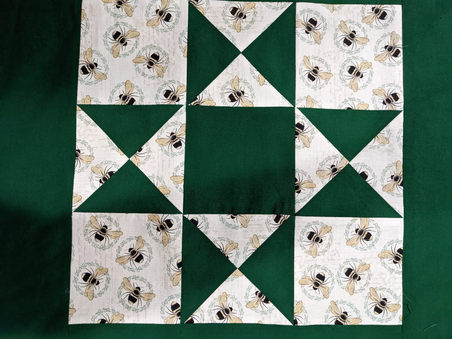 The Hydrangea Square... 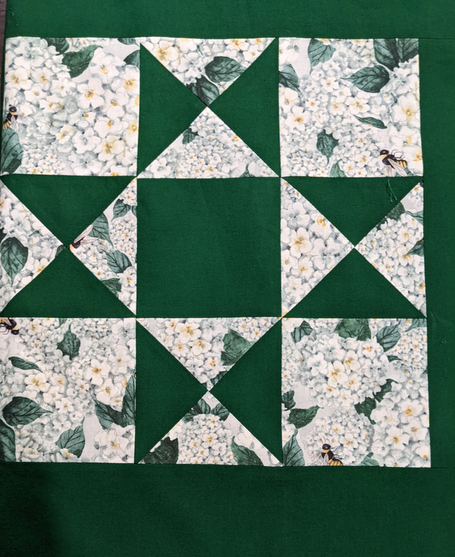 The Tiny Flowers Square... 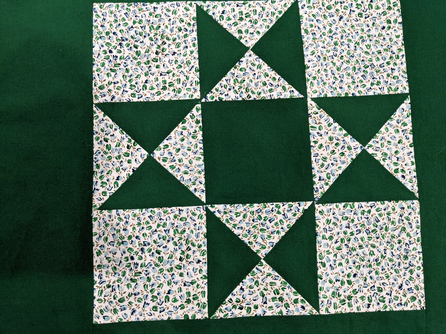 The Blue Square (because it has a blue tint)... 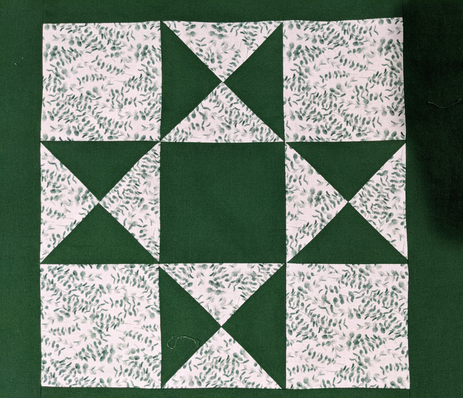 The Leaves Square... 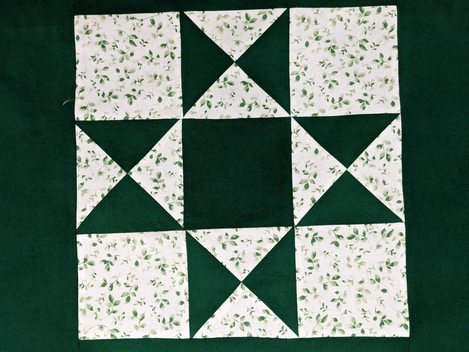 The Frogs Square... 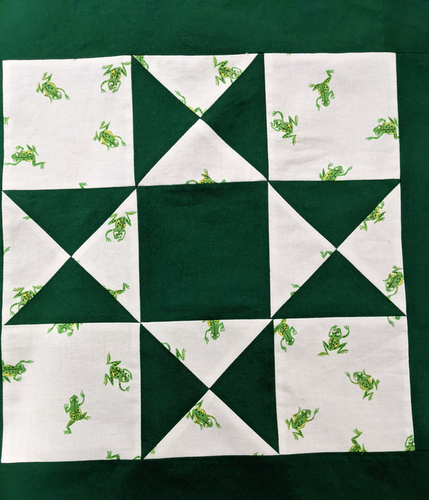 Now I just need the quilt backing, and I can get it to the quilter's and into her long queue!!! But I am a little stuck. I will have to find a suitable fabric. I had bought reams of the bee fabric, originally intending that it would be the backing. 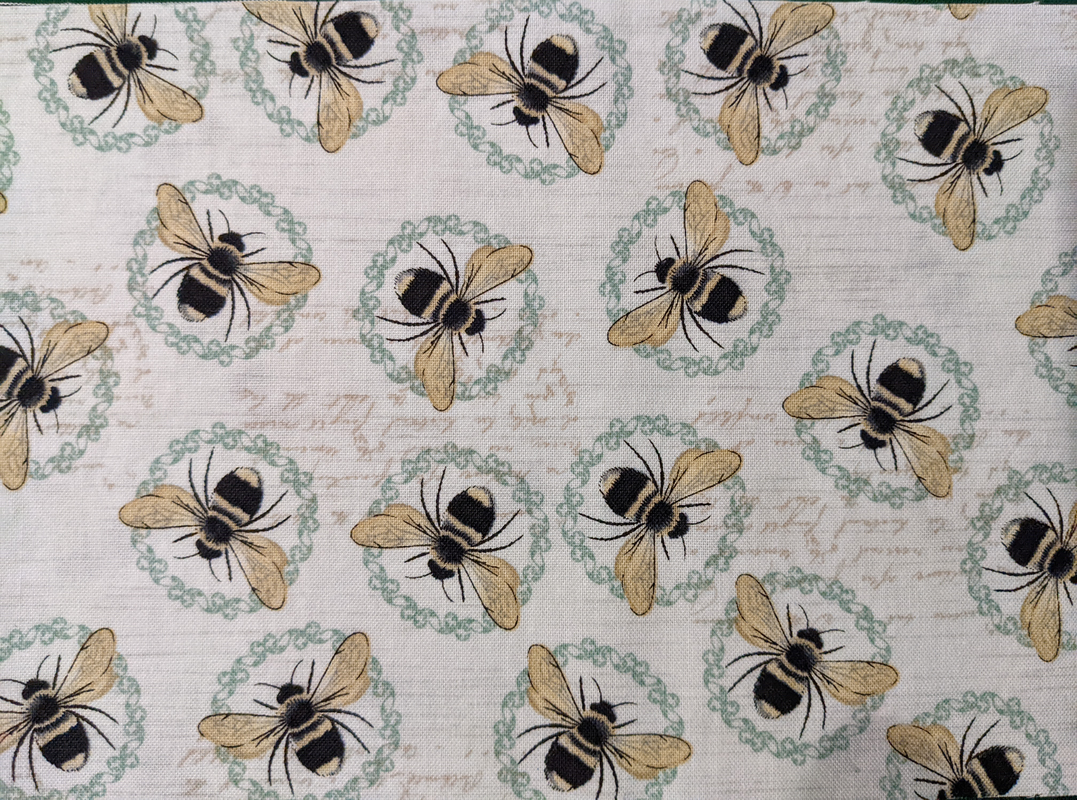 There are now two problems, though, well, maybe three.
I found the fabric I will use for the backing! I found it online at Hawthorne Supply Co. The only bummer is that it will take a week or two to get here. :-( So I won't be able to get the quilt sandwich to the quilter's for a while.  Update: I finished the back! I made a seam down the middle and matched the print perfectly using the same technique as with my sister's quilt. Unfortunately, the repeat was over 4 inches horizontally, and I didn't have enough width to give the longarmer the 4 extra inches she needs on each side. I was short about 3.5 inches. I had enough extra from what I trimmed for the center matching to add 2 inches to either side of the back. That print didn't match at all of course, so I'm hoping whatever of that bit is needed when the quilting is done isn't much and ideally will be buried in the binding.
I got it all done and took it to the quilter's today!!! She can't get to it before OCTOBER. I'm glad she's doing great business. She's very good and she's only 15 minutes away from me. Having put on some pounds (God, is that all she talks about these days?), but wanting to evolve from my sweats-and-tee-shirt look to something more thoughtful (it's not very nice to not even try to look good and to go out in public looking dumpy). But I don't have anything that fits. I thought some circle skirts would be comfortable and nice-looking. Skirt #1: Goodwill-Sheet TestI first made a test skirt out of a jersey sheet I bought from Goodwill. I wanted to try a wider elastic waistband and I knew the diameter of the skirt couldn't be too much wider than my hips because I didn't want the waistband itself to gather. It was meh. I mean, it's just a test garment and the stitching on the waistband (and the thread color) can be forgiven, but the elastic is too wide for me, I think. 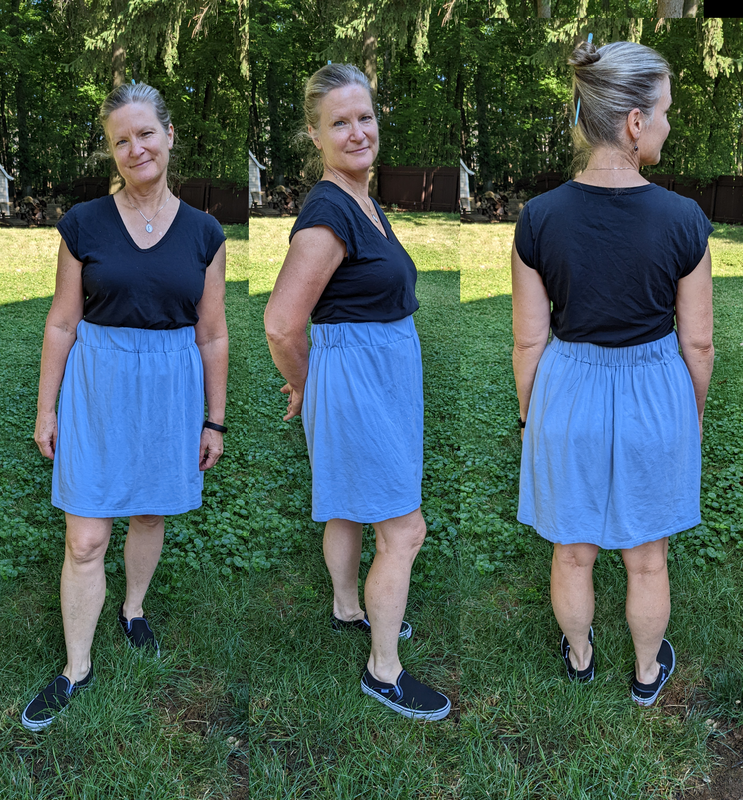 Skirt #2: Gathered MaxiBut then I found a cheap and lightweight jersey with a pretty design on huge markdown in the bargain bin at Joann's. I decided to try again using this fabric to make a maxi skirt. The elastic for this waistband was not as wide as on the test skirt—1.75" maybe—and I like it much better. But really, this style is not the most flattering for me I think. I would like to be able to wear a maxi skirt—I think it would keep me warmer during the summer months indoors at restaurants and such. But, alas, this look does not spark joy. Might be the pounds. 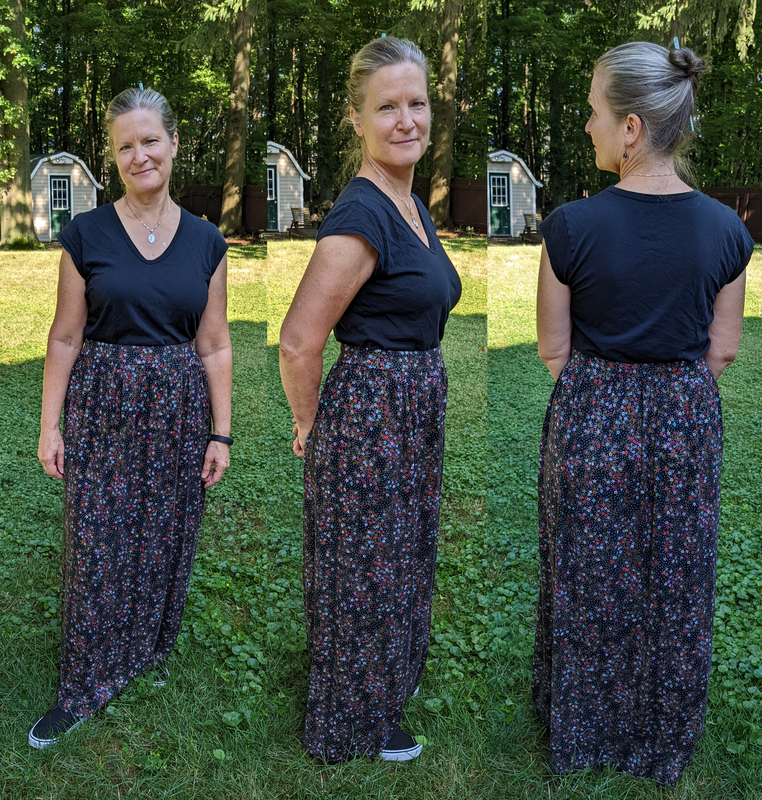 Skirt #3: Narrow Gathered WaistAnd then I was going through a bin of fabric and found a cheap knit I'd bought 10 years ago for a tie-making project that was never completed and I thought it might make a nice cheap and quick skirt for bumming around the house in the summer. This one I made with a narrow waistband and 1.5 x my hip measurement. It's hideous I suppose, but I wear it. In public. 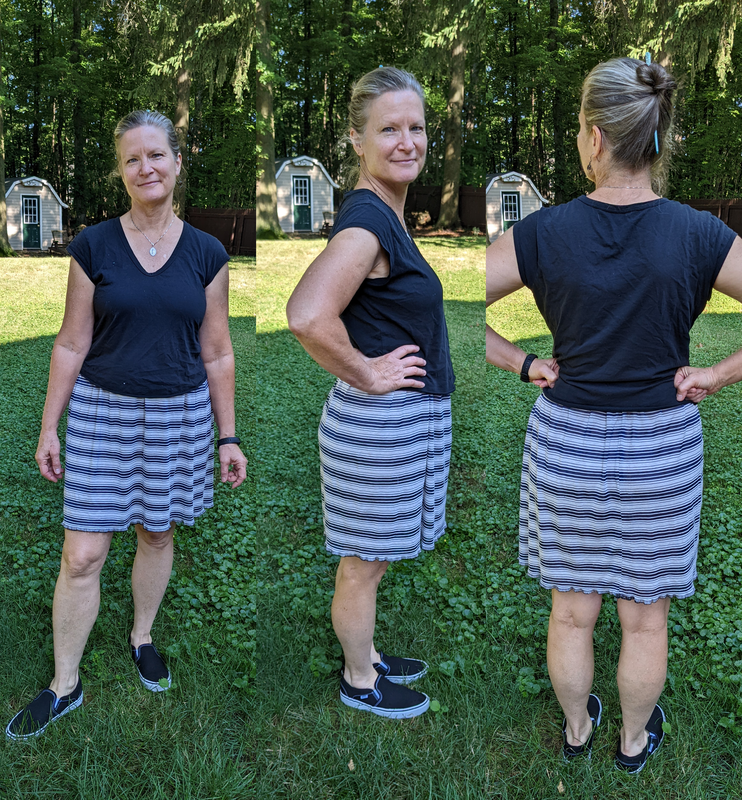 Skirt #4: Woven CircleNext I thought I'd try a woven skirt with a flat waistband and zipper closure. I went searching for a tutorial and found a helpful one at Megan Nielsen ("how to make a dirndl skirt"). I had a feeling a dirndl would not look good on me, but you can't sue me for at least trying. I used a remnant of a lovely Robert Kaufman lawn print in my stash.  Okay, so first off I cut out the pieces following the instructions precisely, including the 5"-width waistband, and basted it together. Five inches? Who has a waist that long? Well, I guess the model does because the skirt looks good on her. On me, it was comical. I took it apart and cut the waistband down to 1.5 inches. Then I sewed it all together and put in the zipper. (I used this super helpful tutorial by Angela Wolf.) I put it on and...no. Way too much gathering for me. I took it all apart. I cut the diameter down to a bit more than 1.5 my waist measurement. Put it all back together and this is the result. 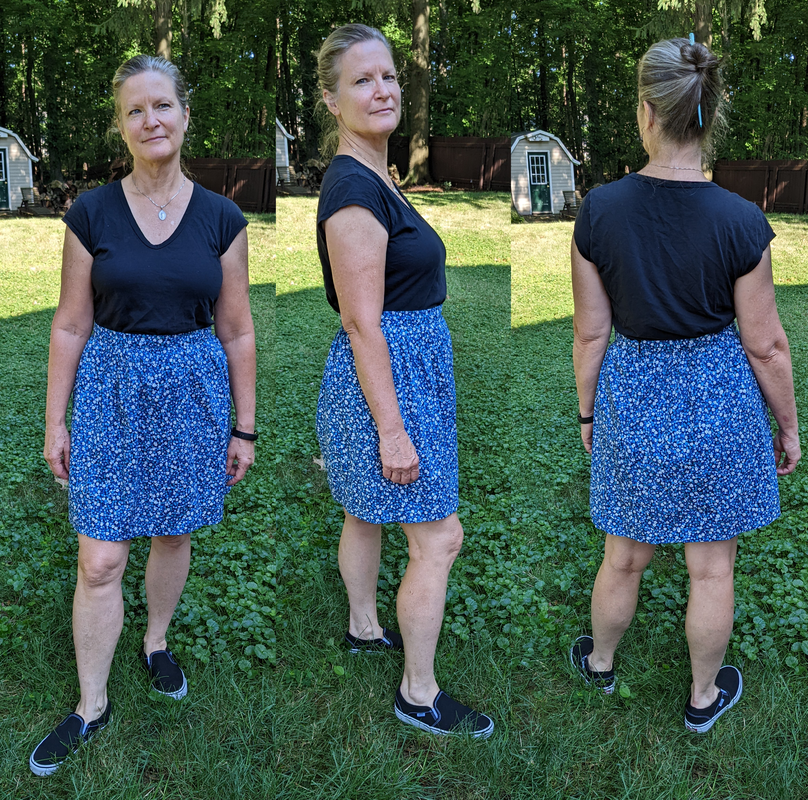 Sigh. No, I don't think so.
Years ago, I had a couple of cotton jersey t-shirt dresses I had bought from Gap. They were cute, comfy, and nice-fitting. My husband raved about them whenever I wore them, and I wore them a lot. One started to look the part, a bit stretched out and a lot stained, so I decided to copy the one that was less worn before I lost my chance. Dress #1: Mock-UpThat was at least a couple years ago. It probably took me another year to sew a dress out of the pattern, and when I did it was because I had found a jersey sheet at Goodwill that I could use without risking any good fabric. Well, the dress turned out really nicely. So nicely, in fact, that I wear that Goodwill sheet Gap dress a lot. It's pretty short and I never hemmed it, so I don't wear it in public...much. But when it's hot, it's awfully nice to wear that lightweight little number. 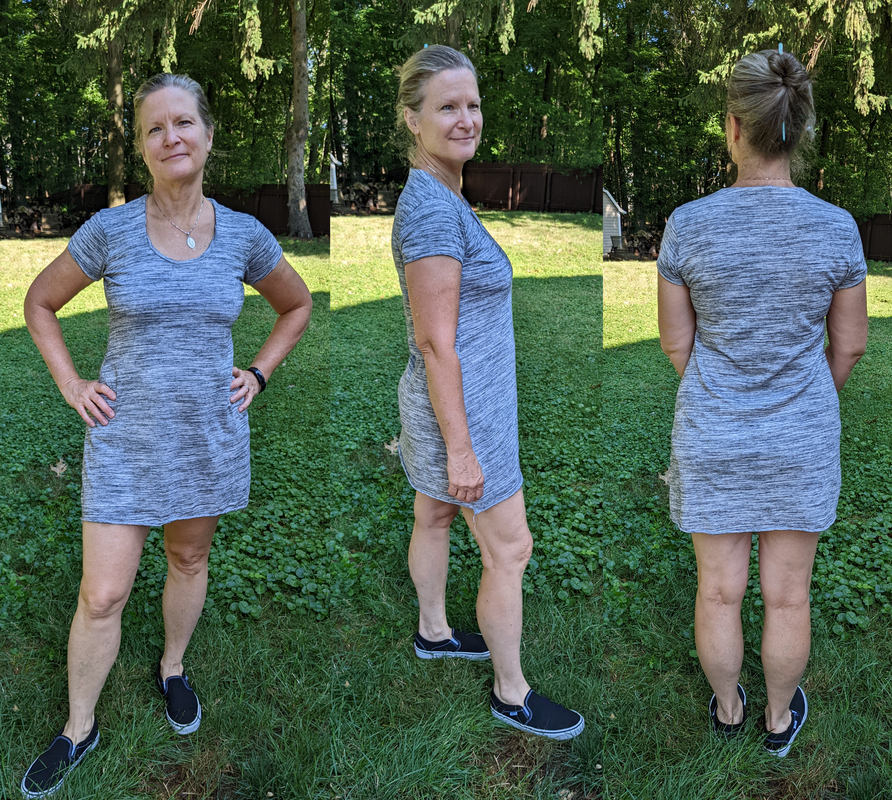 Dress #2: SuperheroNow, I have been meaning to make another for some time. But lots of other things got in the way or took precedence. Then inspiration hit. I was at Joann's getting something for one of the projects I was working on recently...I can't remember what exactly...when I thought: "why not check out the bargain bin again?" And I found a jewel...a lovely cotton interlock with Marvel superheroes on it...for $3 a yard. C'mon. I could not pass it up. It didn't take me long to make it up. It's ridiculously easy to put this dress together—except for the f-ing bands. OMG I took out the neckline band twice before I got it where I wanted it. I first sewed it in wrong. Okay, I had only basted that in but still. I rebasted and used my coverstitch. It was infuriatingly bad. Uneven, all over the place, hideous. I came upstairs cursing how much I hated that Janome Coverstitch 900, how I would never use it again, and bemoaning the fact that I chose it over a Babylock (because it was so much less expensive although it was still not cheap). I even started to hunt around for a Babylock Euphoria. I cooled off, went back to the sewing room, and I ripped the neckline out, not fun, and rebasted and then used a twin needle. That worked beautifully. I had already done the armbands 0n the coverstitch. They were okay, not great, but not noticeable enough for me to rip them out and do them over. I added about 4 inches to the pattern that I made and used for the Goodwill version, but I ended up cutting off 2 inches before hemming. Isn't it cute? 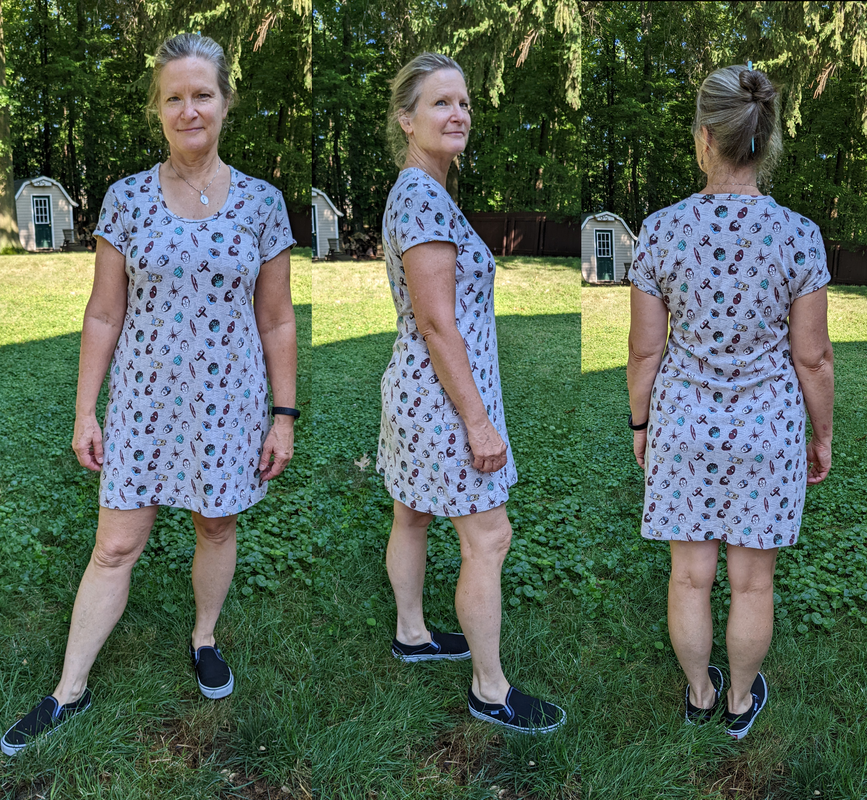 Closeup of the neckline and fabric design: 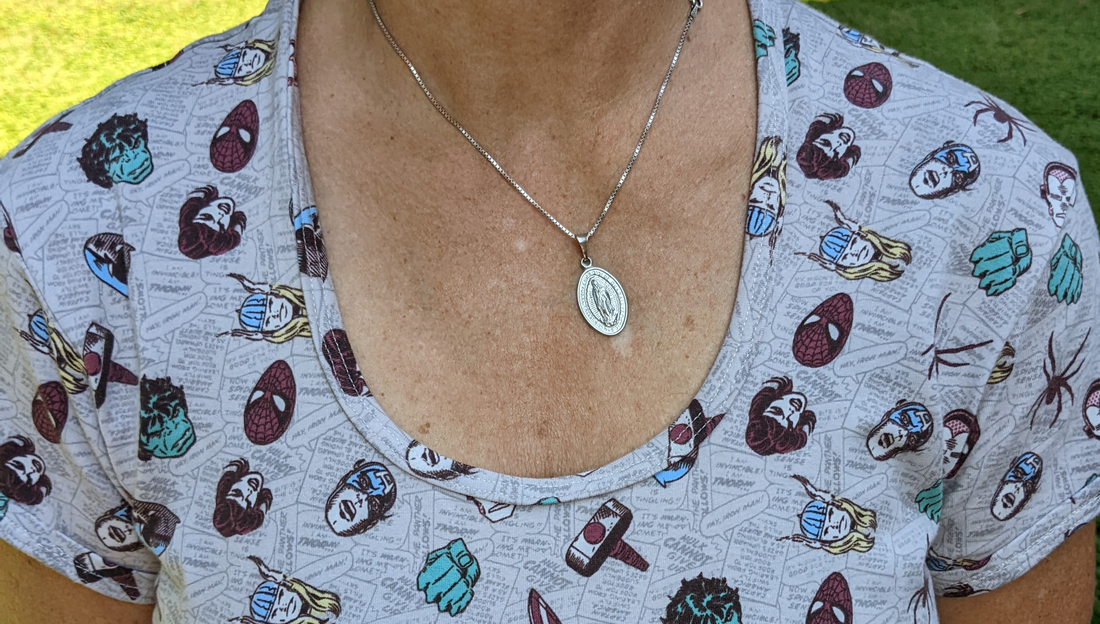 Dress #3: SpidermanSoon after I was back at Joann's getting buttons for the blue linen Harvey when I thought..."what if there is another awesome bargain in that bin?" And do you know what? There was: a similar Marvel-themed interlock, also for $3 a yard. I made up another Gap-copy dress as soon as I had washed the fabric. This time I went straight to the twin-needle technique but I started with the hem, thank goodness. Because it looked like crap. I tried many settings on my machine and it just would not stop tunneling. Frustrated, I went back to the coverstitch and tested some stitches on the new fabric. Still terrible. Then, fortunately, it dawned on me that I might not have the settings in the best place. Maybe I could do some research. I first went to YouTube and found a very helpful and basic tutorial about my machine on the Last Stitch channel. She noted the importance of the differential feed setting. So next I checked in the manual. OMG. Somehow all my settings were in all sorts of strange places. I returned all the tensions, the stitch lengths, and the stitch widths back to recommended settings and played with the differential feed a little and found a setting that created a beautiful hem. Finally, I basted the arm and neckbands on and coverstitched those. The neckline. Arrrgh! I decided to baste it down on the front and follow the basting on the coverstitch. It turned out much better than when my settings were all awry, but still, the stitch placement was not perfect, and wouldn't you know, the worst spot was on the front. There is a little lip the floats a little bit above the main fabric and irritates me (my sensibilities, not my skin). Still, in the end, I said "fuck it. It's good enough." Now if I can only lose 20 pounds, it might be downright adorable. 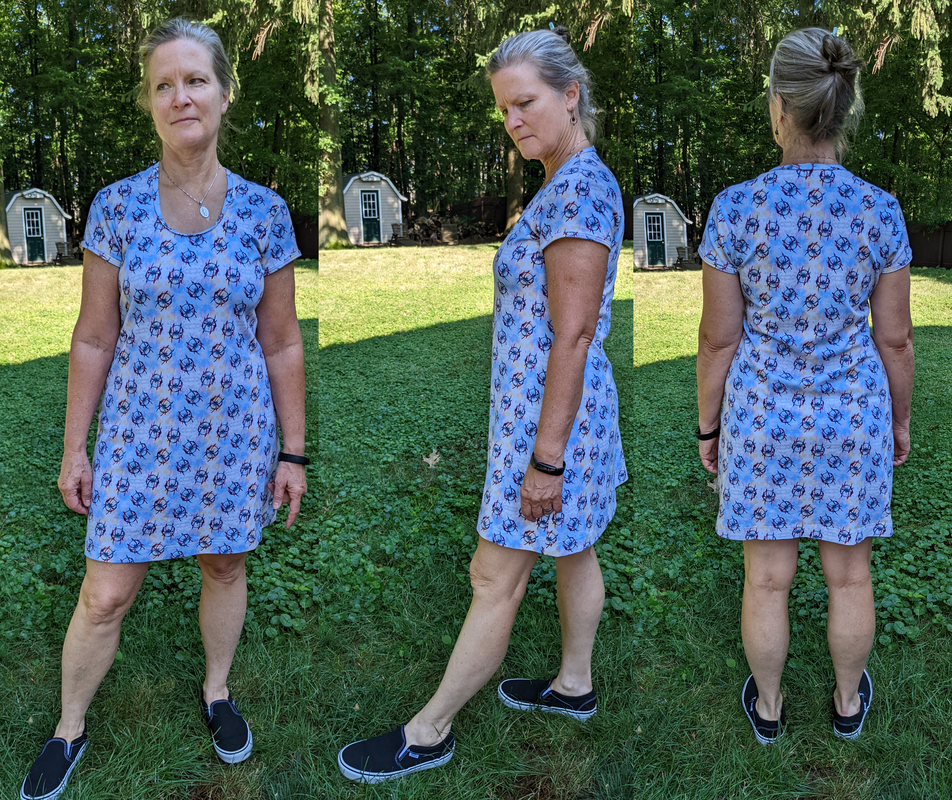 Closeup of the neckline and fabric design: 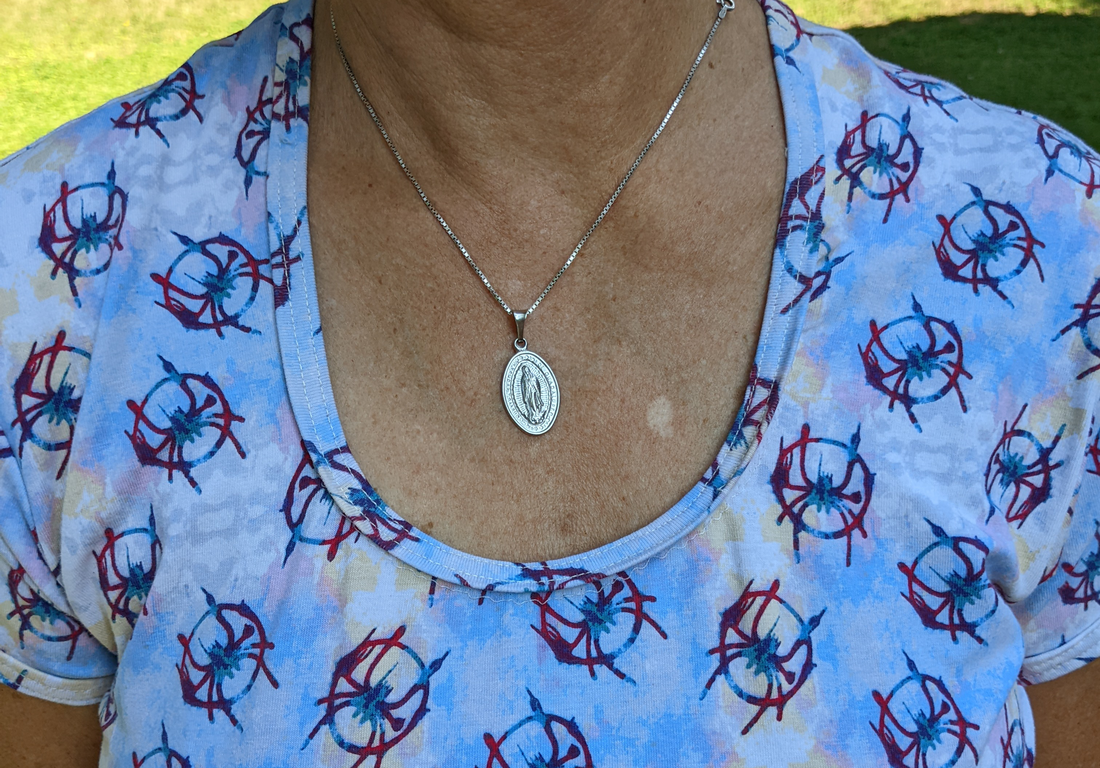 |
AuthorI am a wife and mother. I am retired: yay! Archives
April 2024
Categories
All
|
 RSS Feed